Navigating at Burning Man
It can be hard to get around at Burning Man. Despite the clock-like road layout and posted road signs, it is easy to get confused.
- Places you may want to revisit may not be within the city blocks. For example, it is easy to find A & 7:00 again, but how about that cool art you saw in deep playa?
- The road signs are ritually removed near the end of the week.
- Landmarks and tall objects change, especially near the end of the week.
- There are blue light markers for portos, but they can be hard to see among the huge visual noise of Burning Man.
- The nearest porto in the middle of deep playa may be far or not be easy to find.
You could just use your phone, download offline maps, and follow the little blue dot. You could even make a custom app that does everything my device does. But what’s the fun in that? Let’s make bespoke hardware!
You can find the complete design files (for the hardware and firmware) in my Github repo.
Design
Functionality
The device should be simple, providing only these functions:
- Show you where you are right now.
- Navigate to somewhere you’ve been before.
- Navigate to a porto.
Design Goals
- Simple and direct interface. No complex menu systems.
- Useful for both biking and walking.
- Week-long battery life - recharge as few times as possible during the burn.
- Low total cost for building about 20 units.
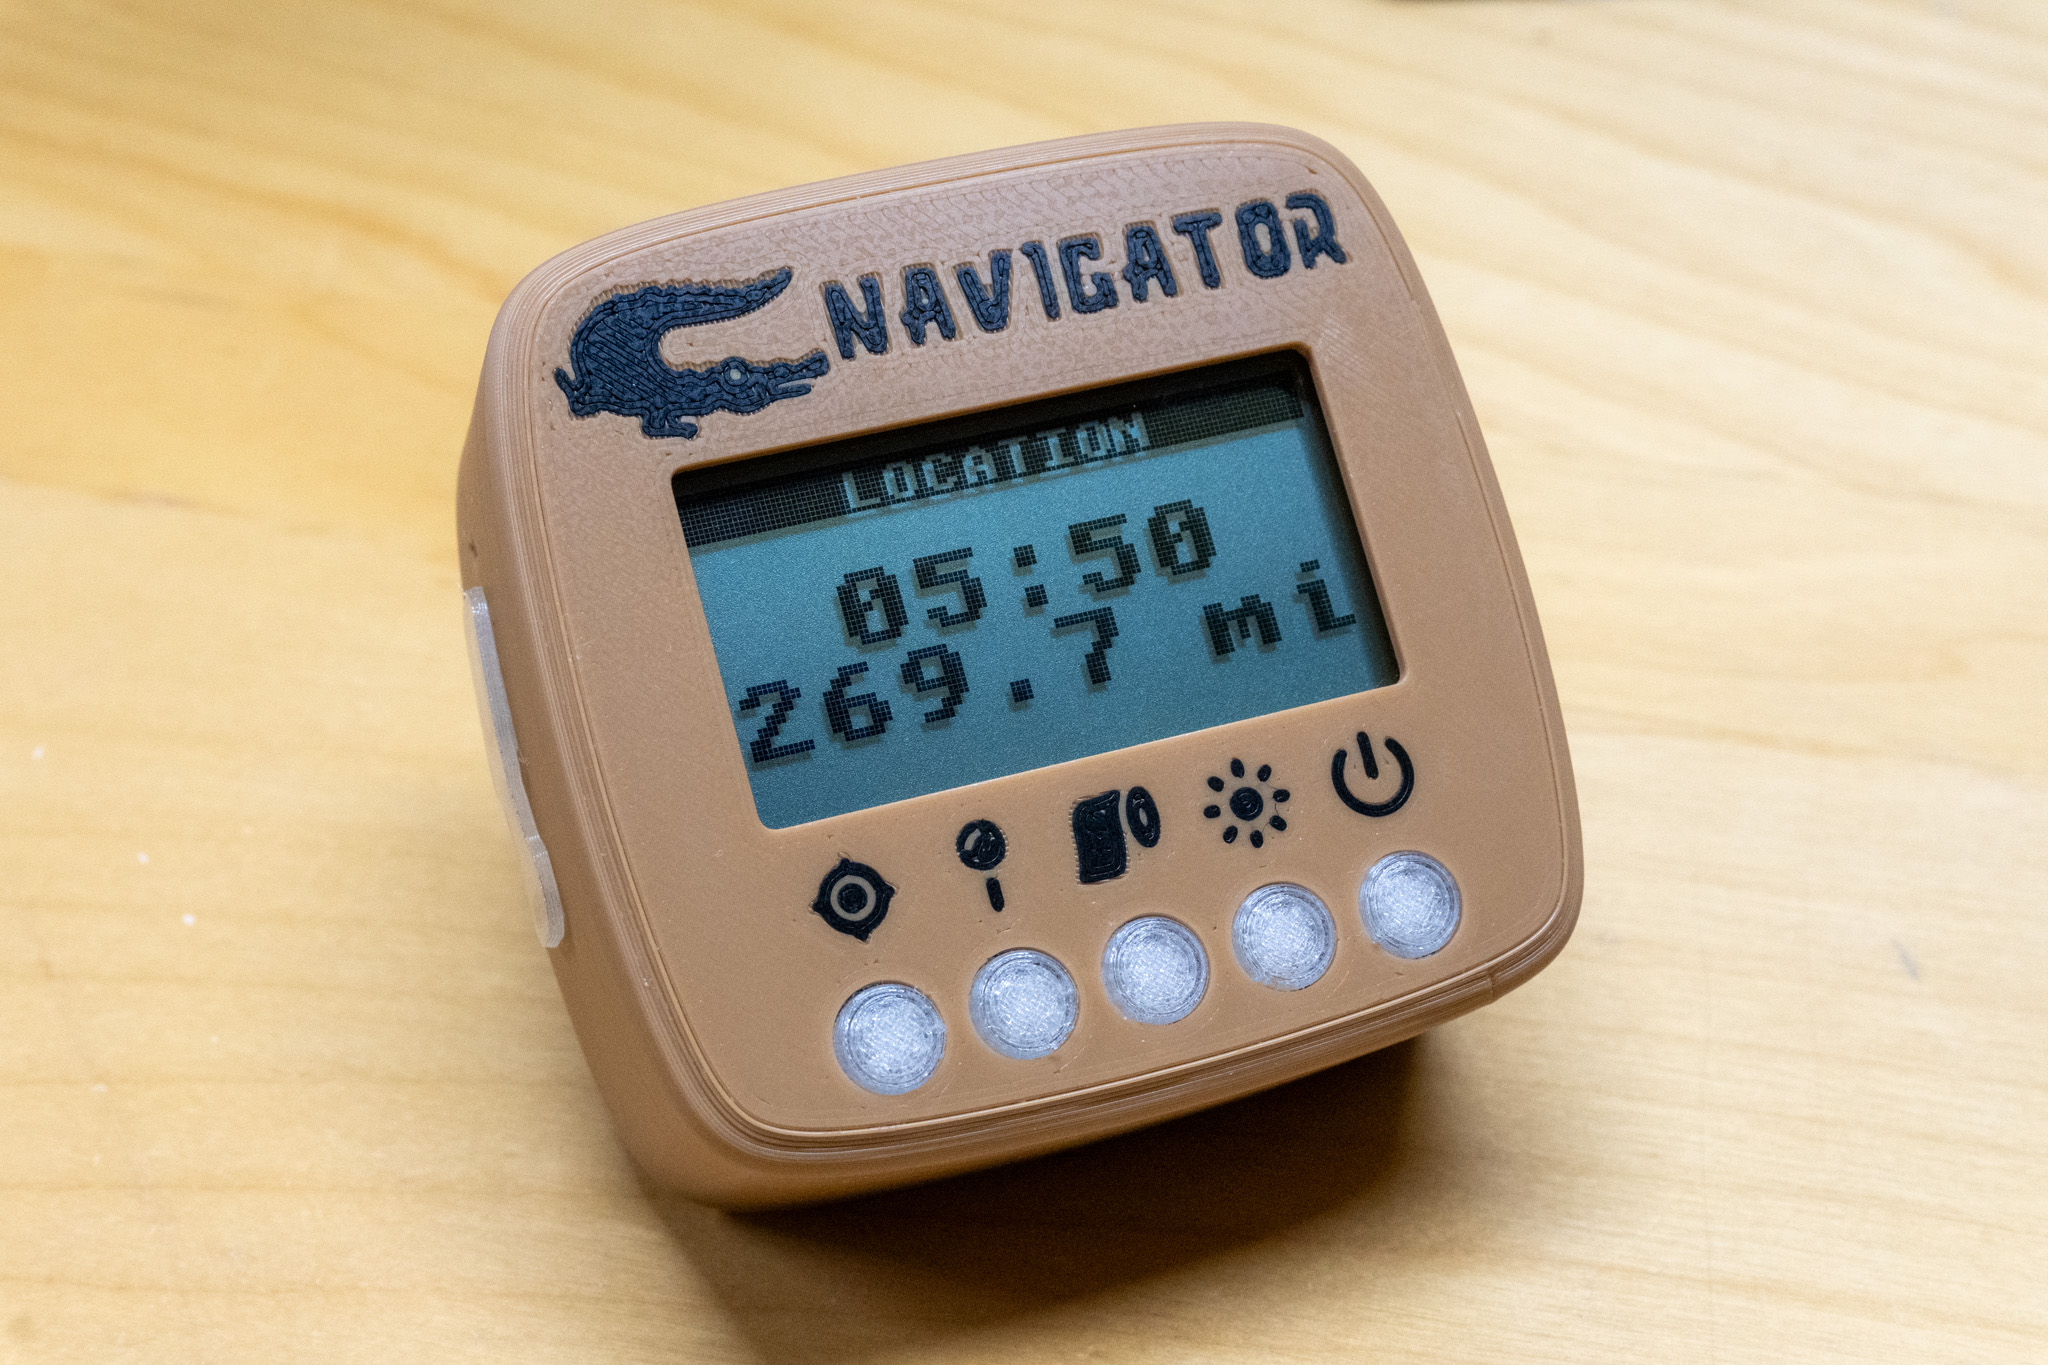
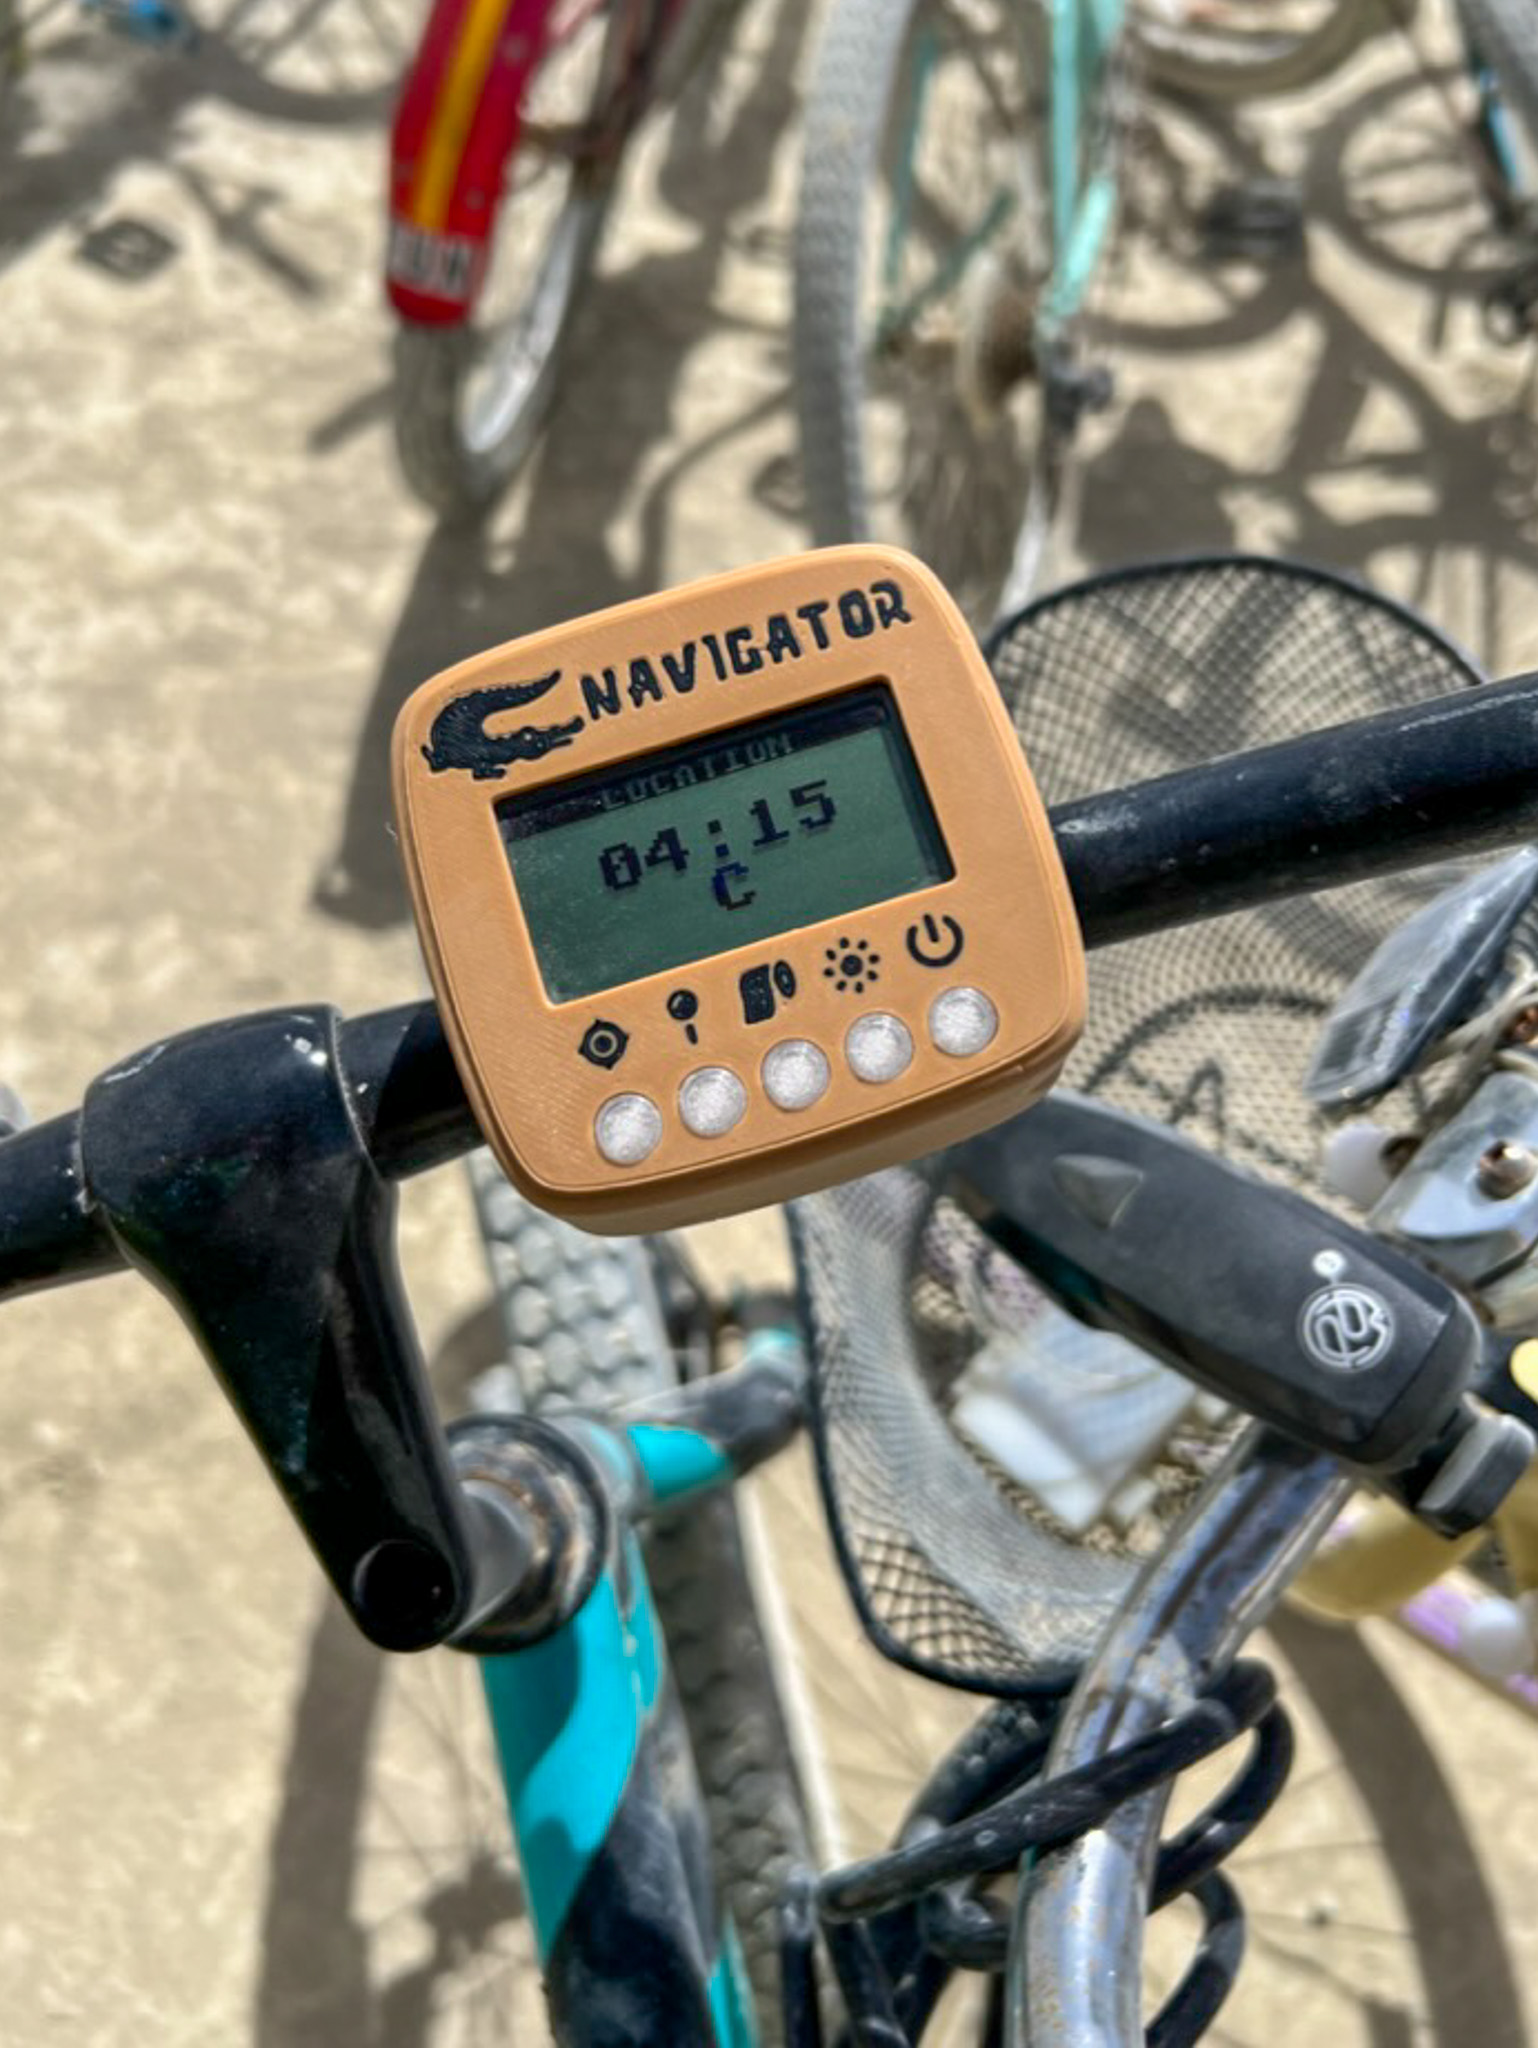
User Interface
Location
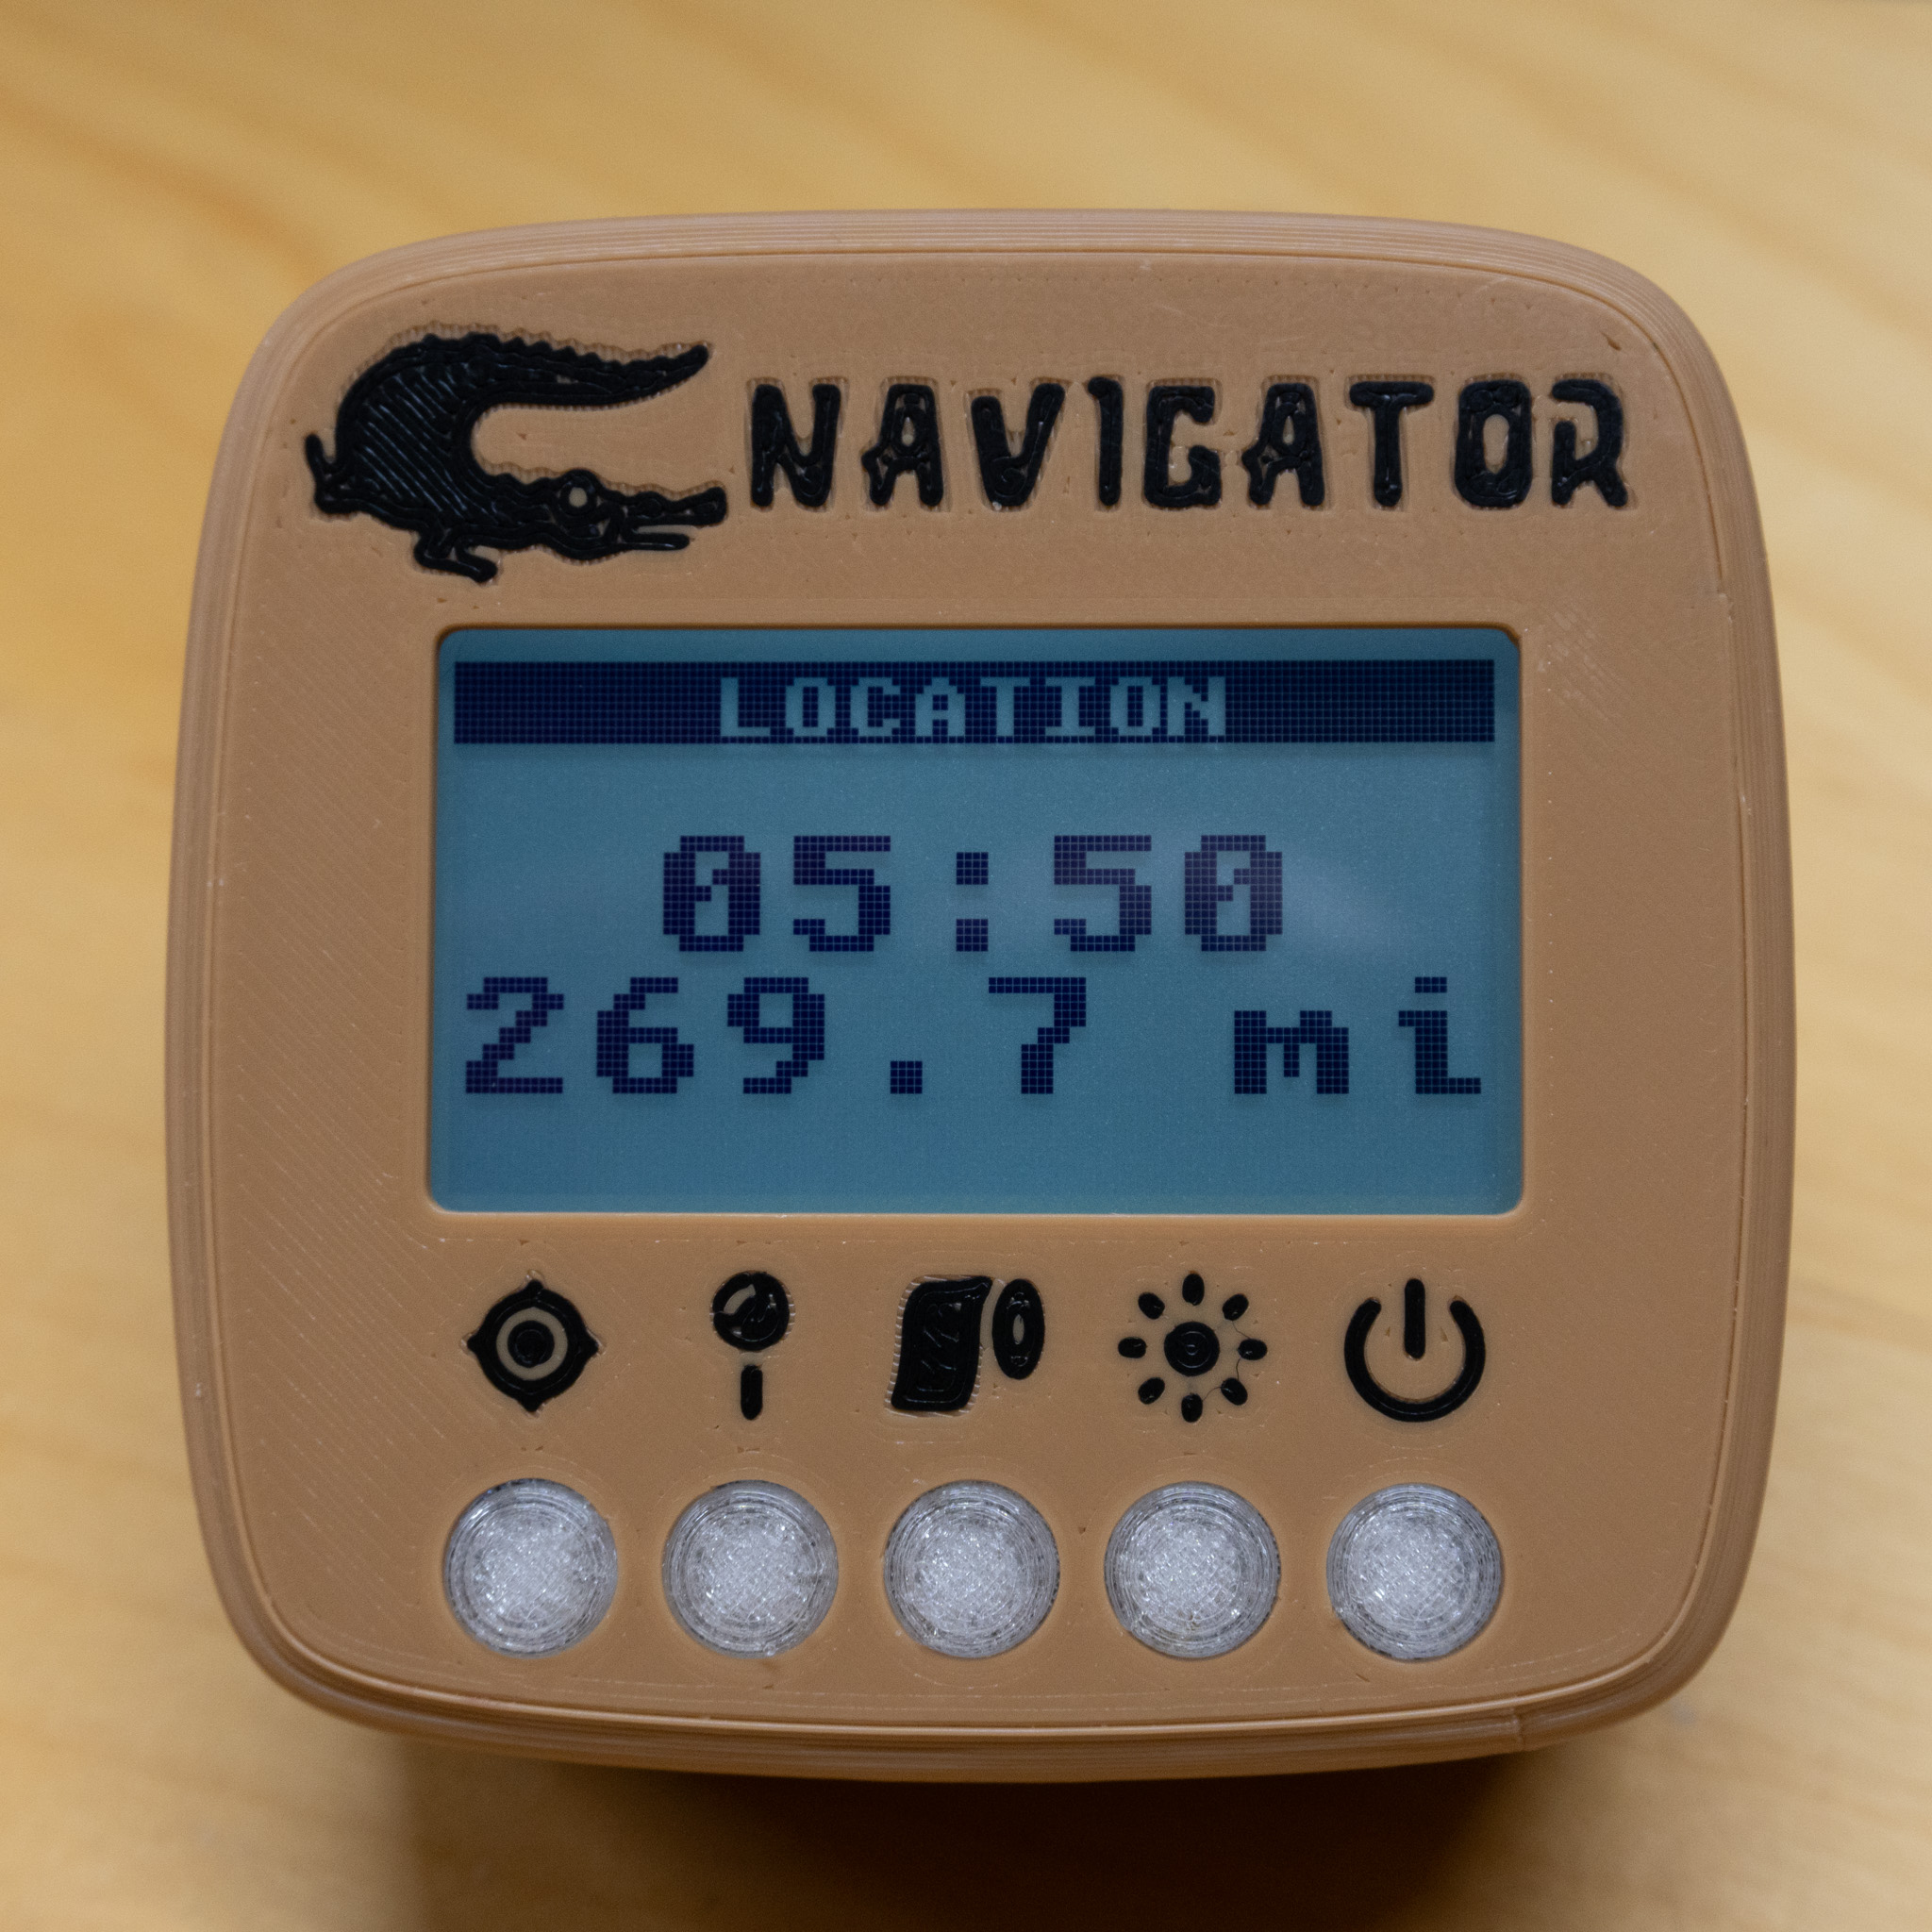 Display the current location in a useful format.
There are two address formats, which depend on where you are:
- Inside city blocks:
HH:MM / Road- e.g.05:50 / 1.2 mi - Everywhere else:
HH:MM / Distance- e.g.05:50 / S
The distance units automatically adjust: 0 to 9999 feet, then in miles.
Waypoint Navigation
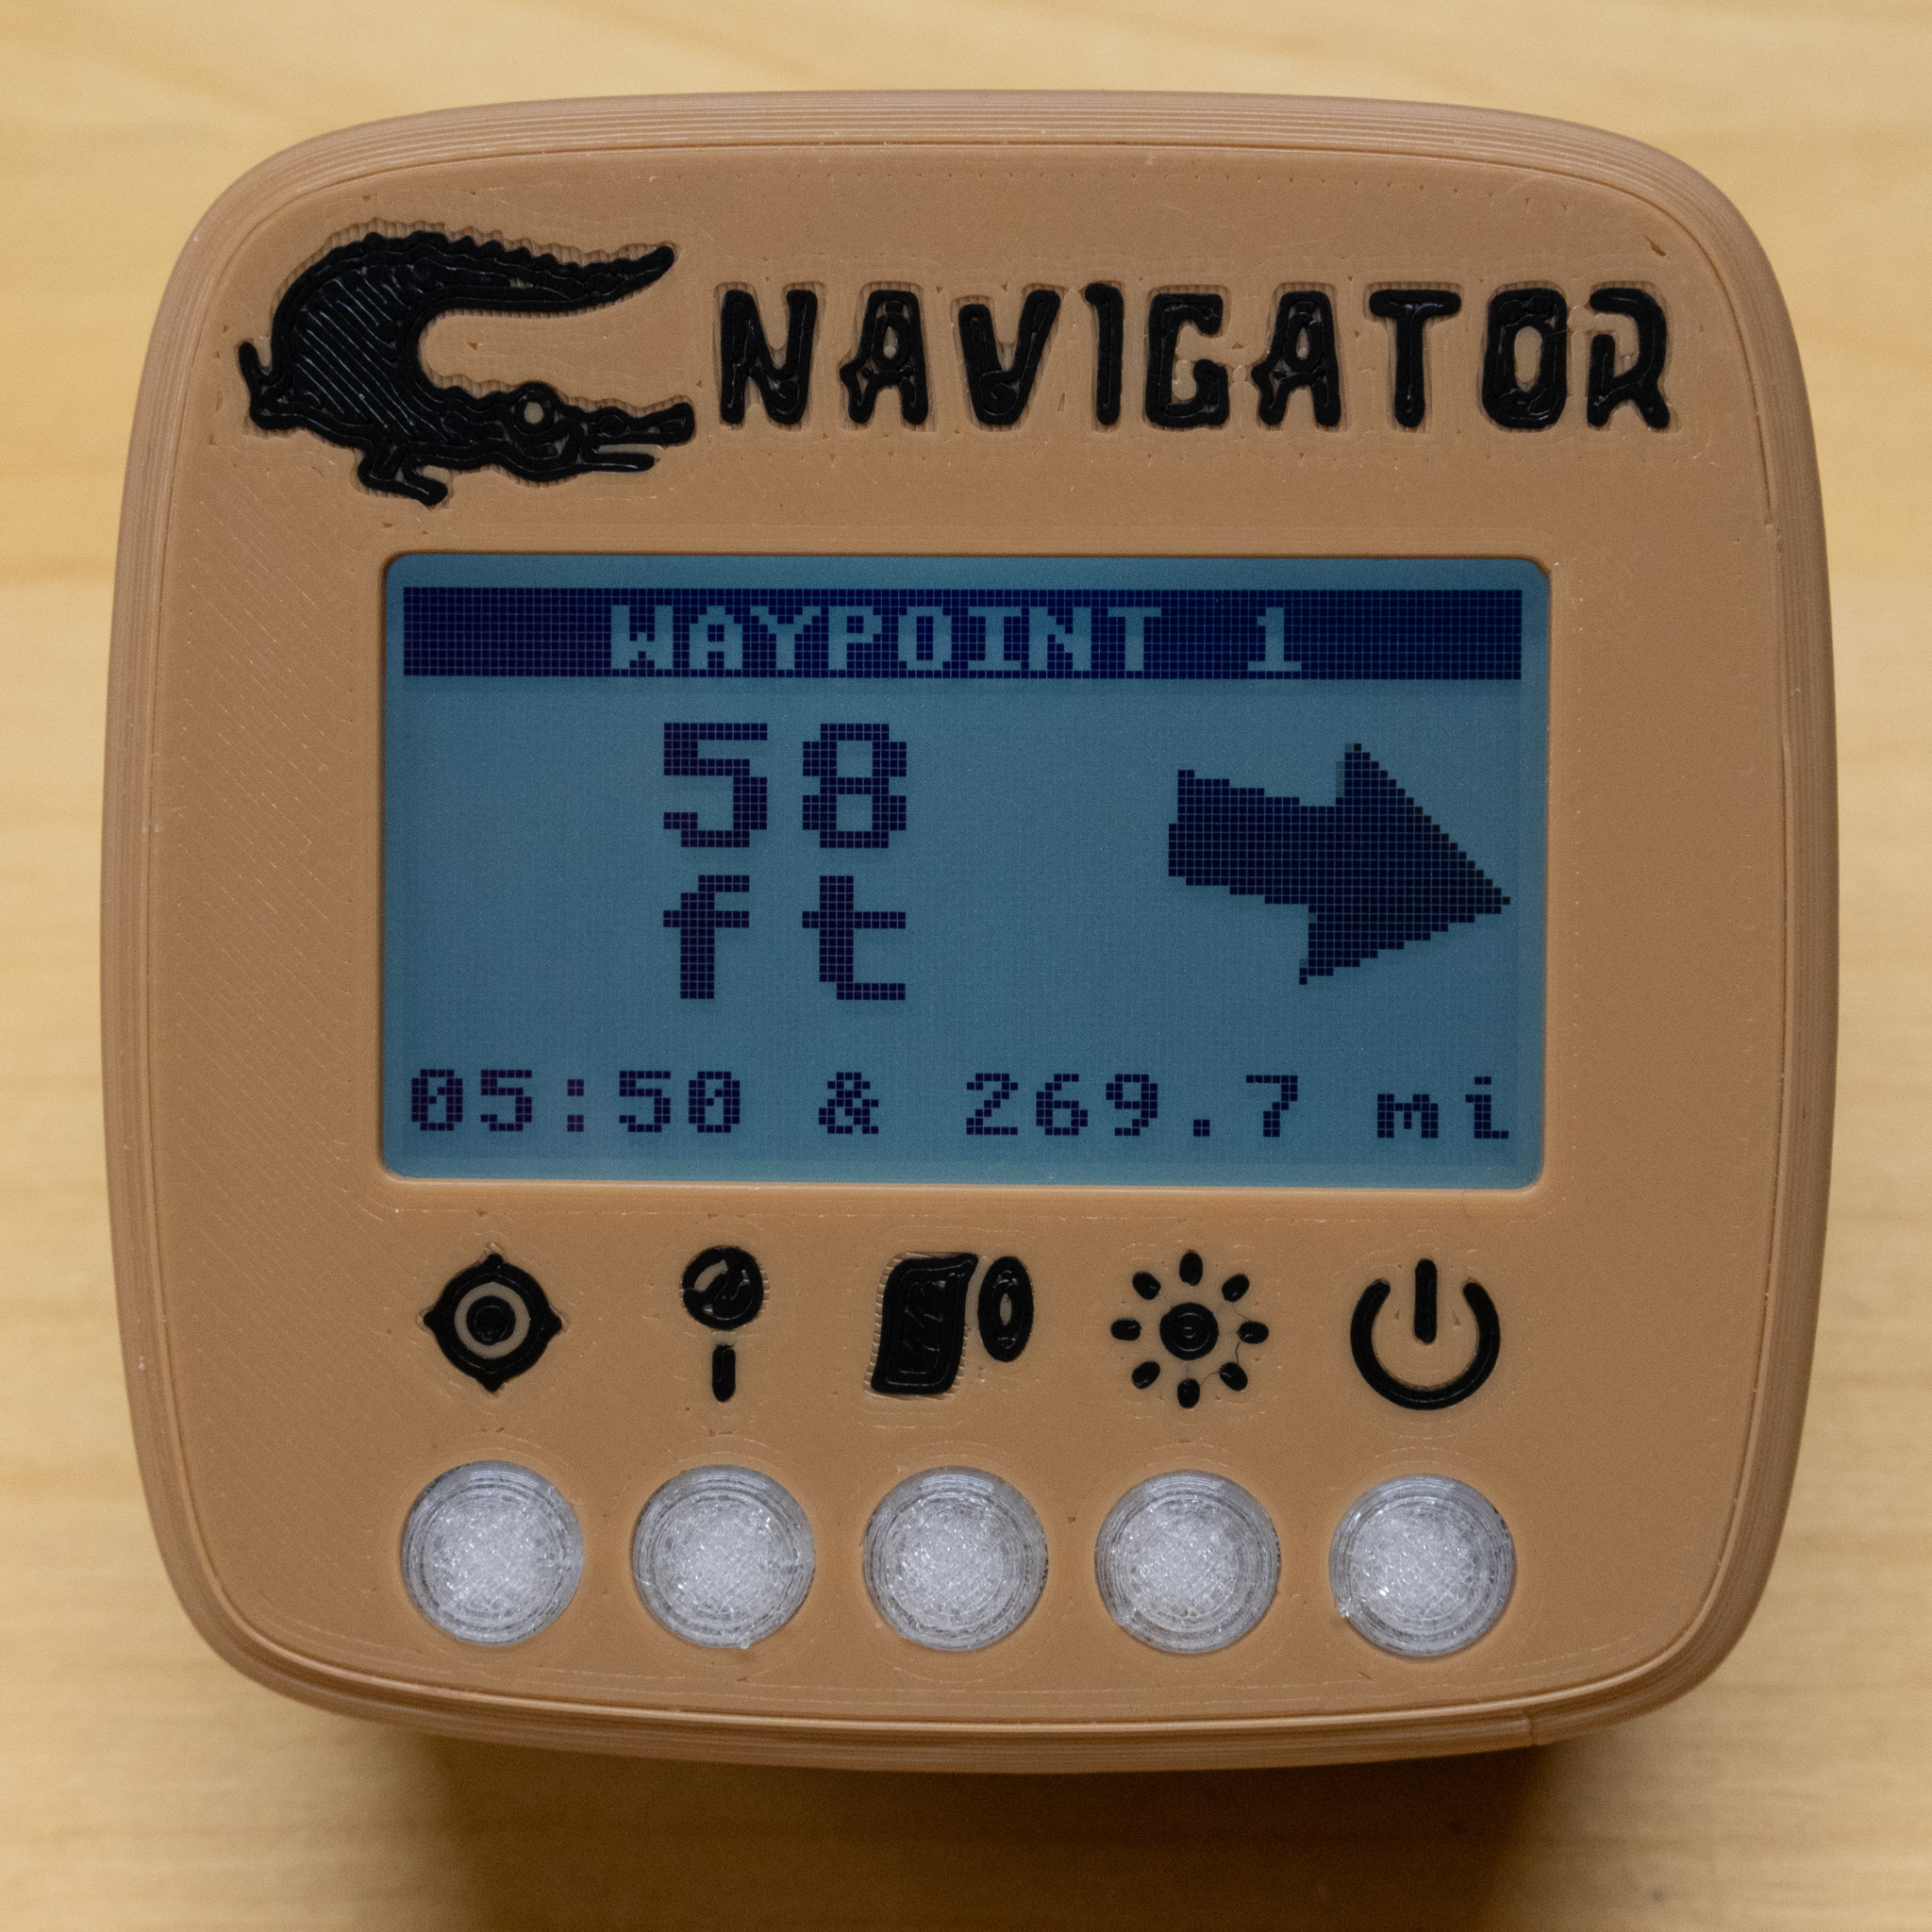
- Show the distance and bearing to a waypoint stored in non-volatile memory.
- Single press to cycle through 5 possible waypoints.
- Press and hold to store the current location to the waypoint.
Bathroom Navigation
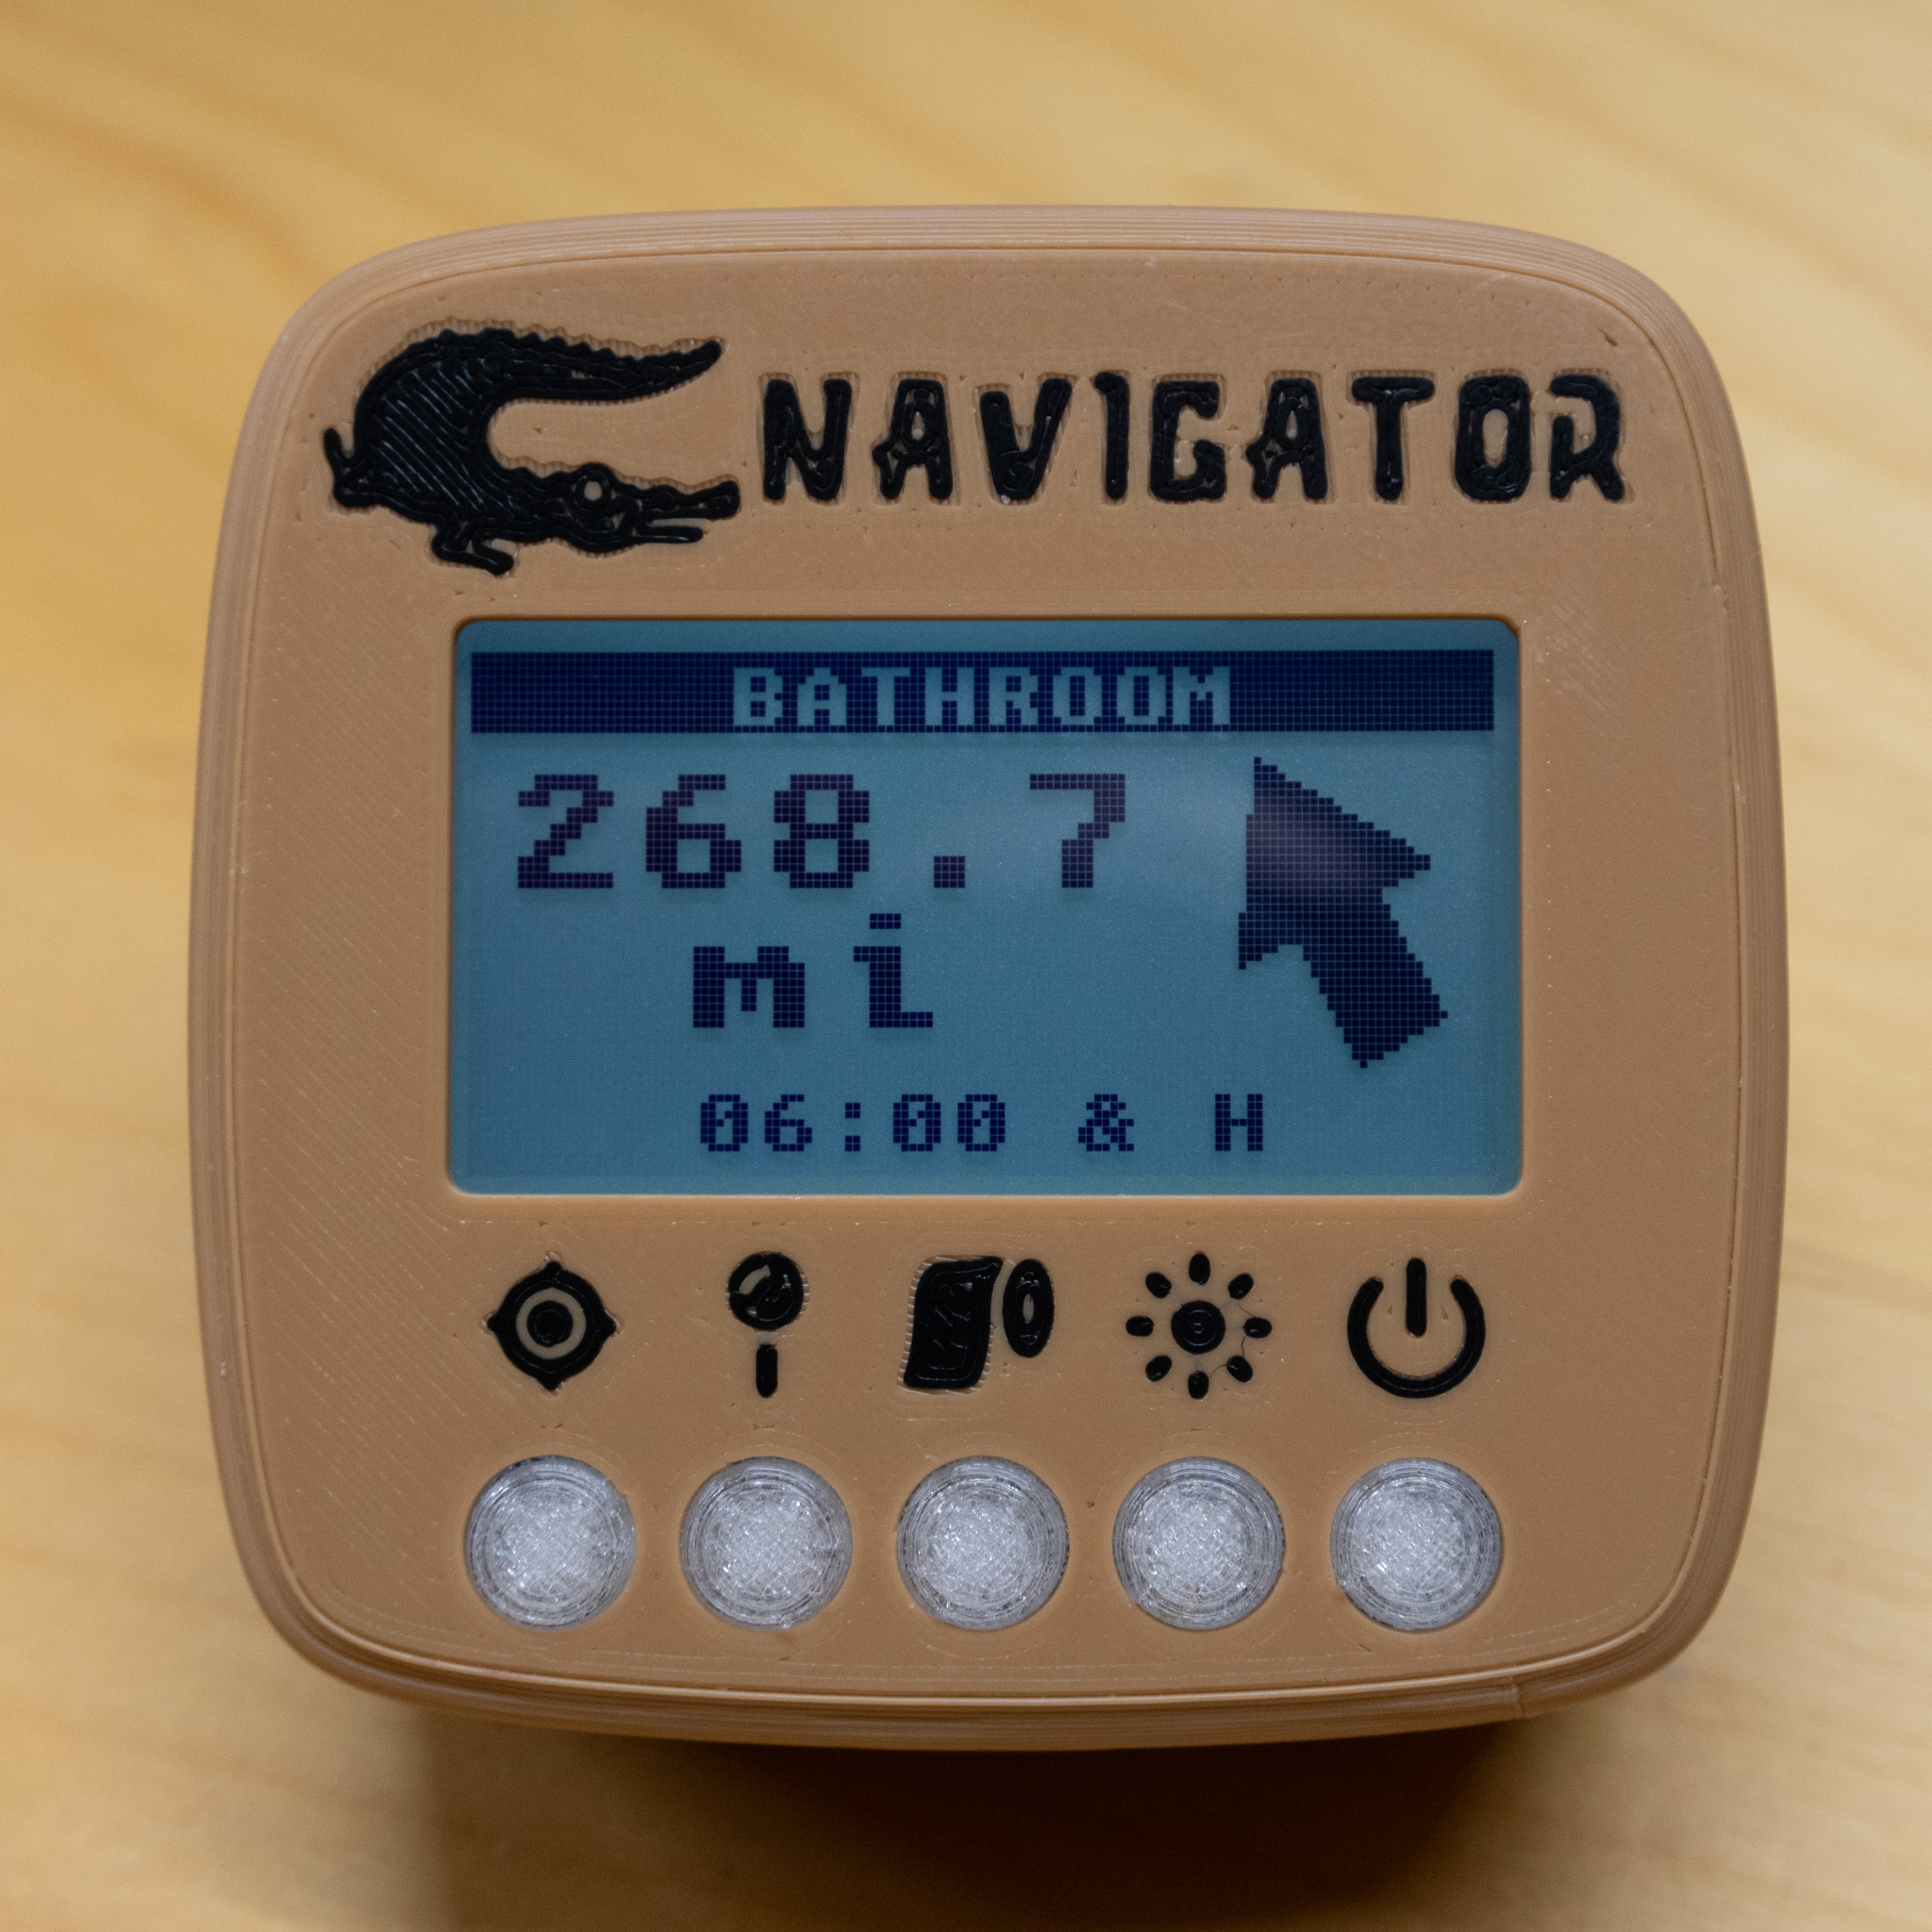 Show the distance and bearing to the nearest porto.
Brightness & Power
- Single press to cycle through 4 different brightness levels.
- Press and hold to turn on or off.
Hardware
Display
The display’s main constraints were sunlight readability and graphic capability. Transflective graphic LCDs are very legible in sunlight and have low power requirements.
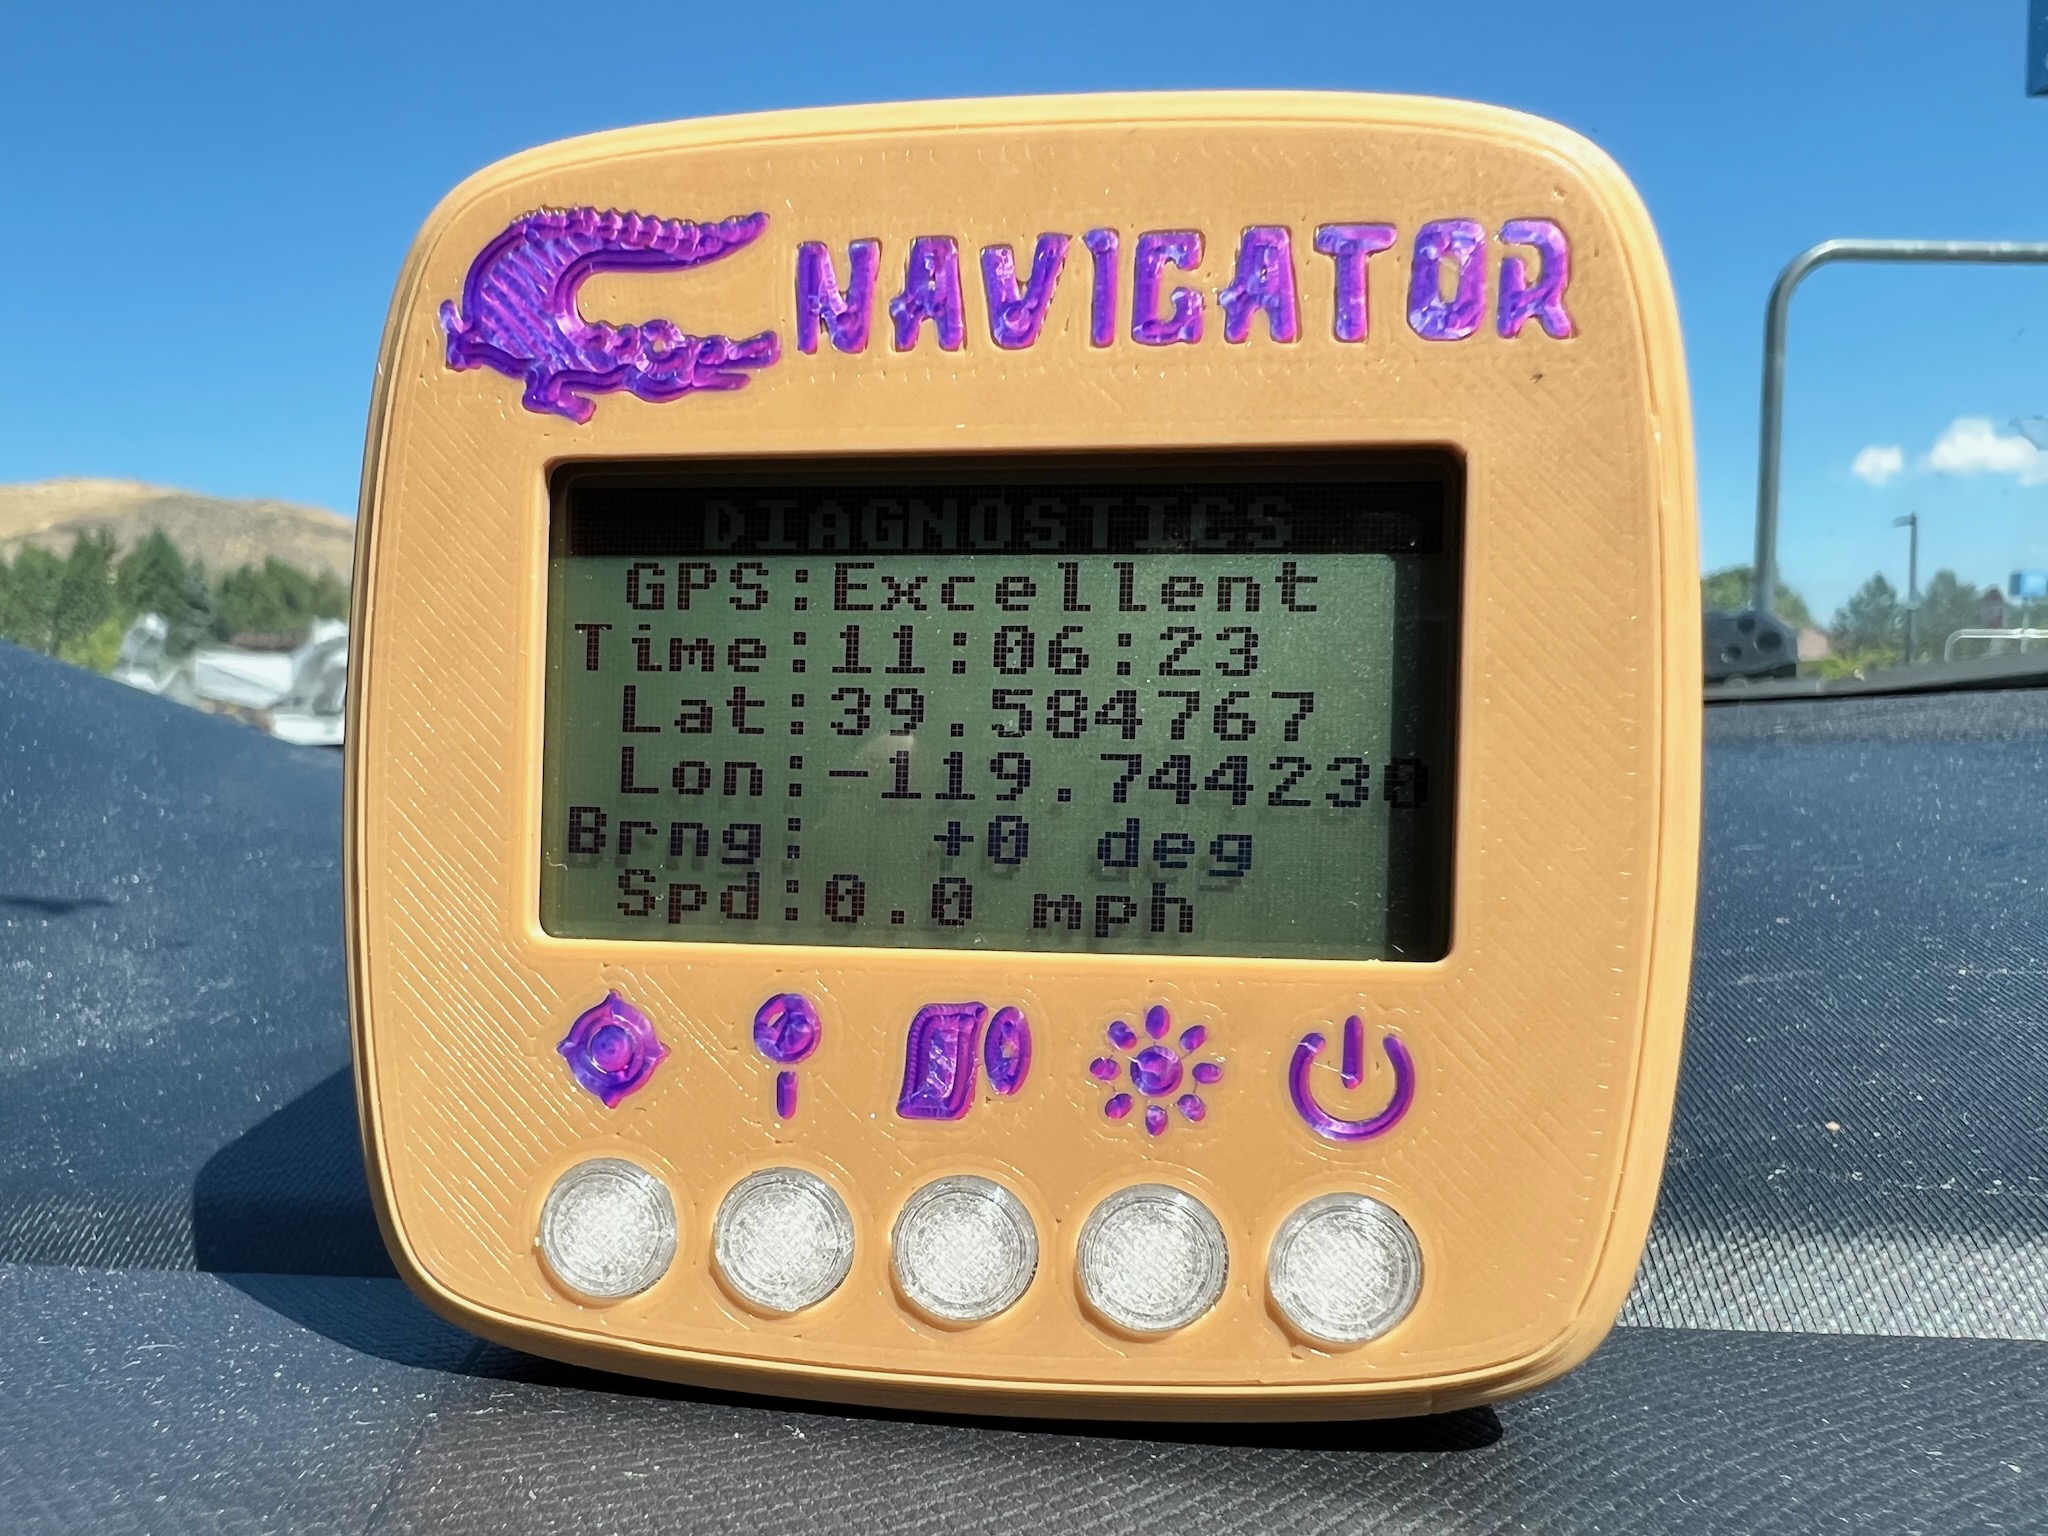
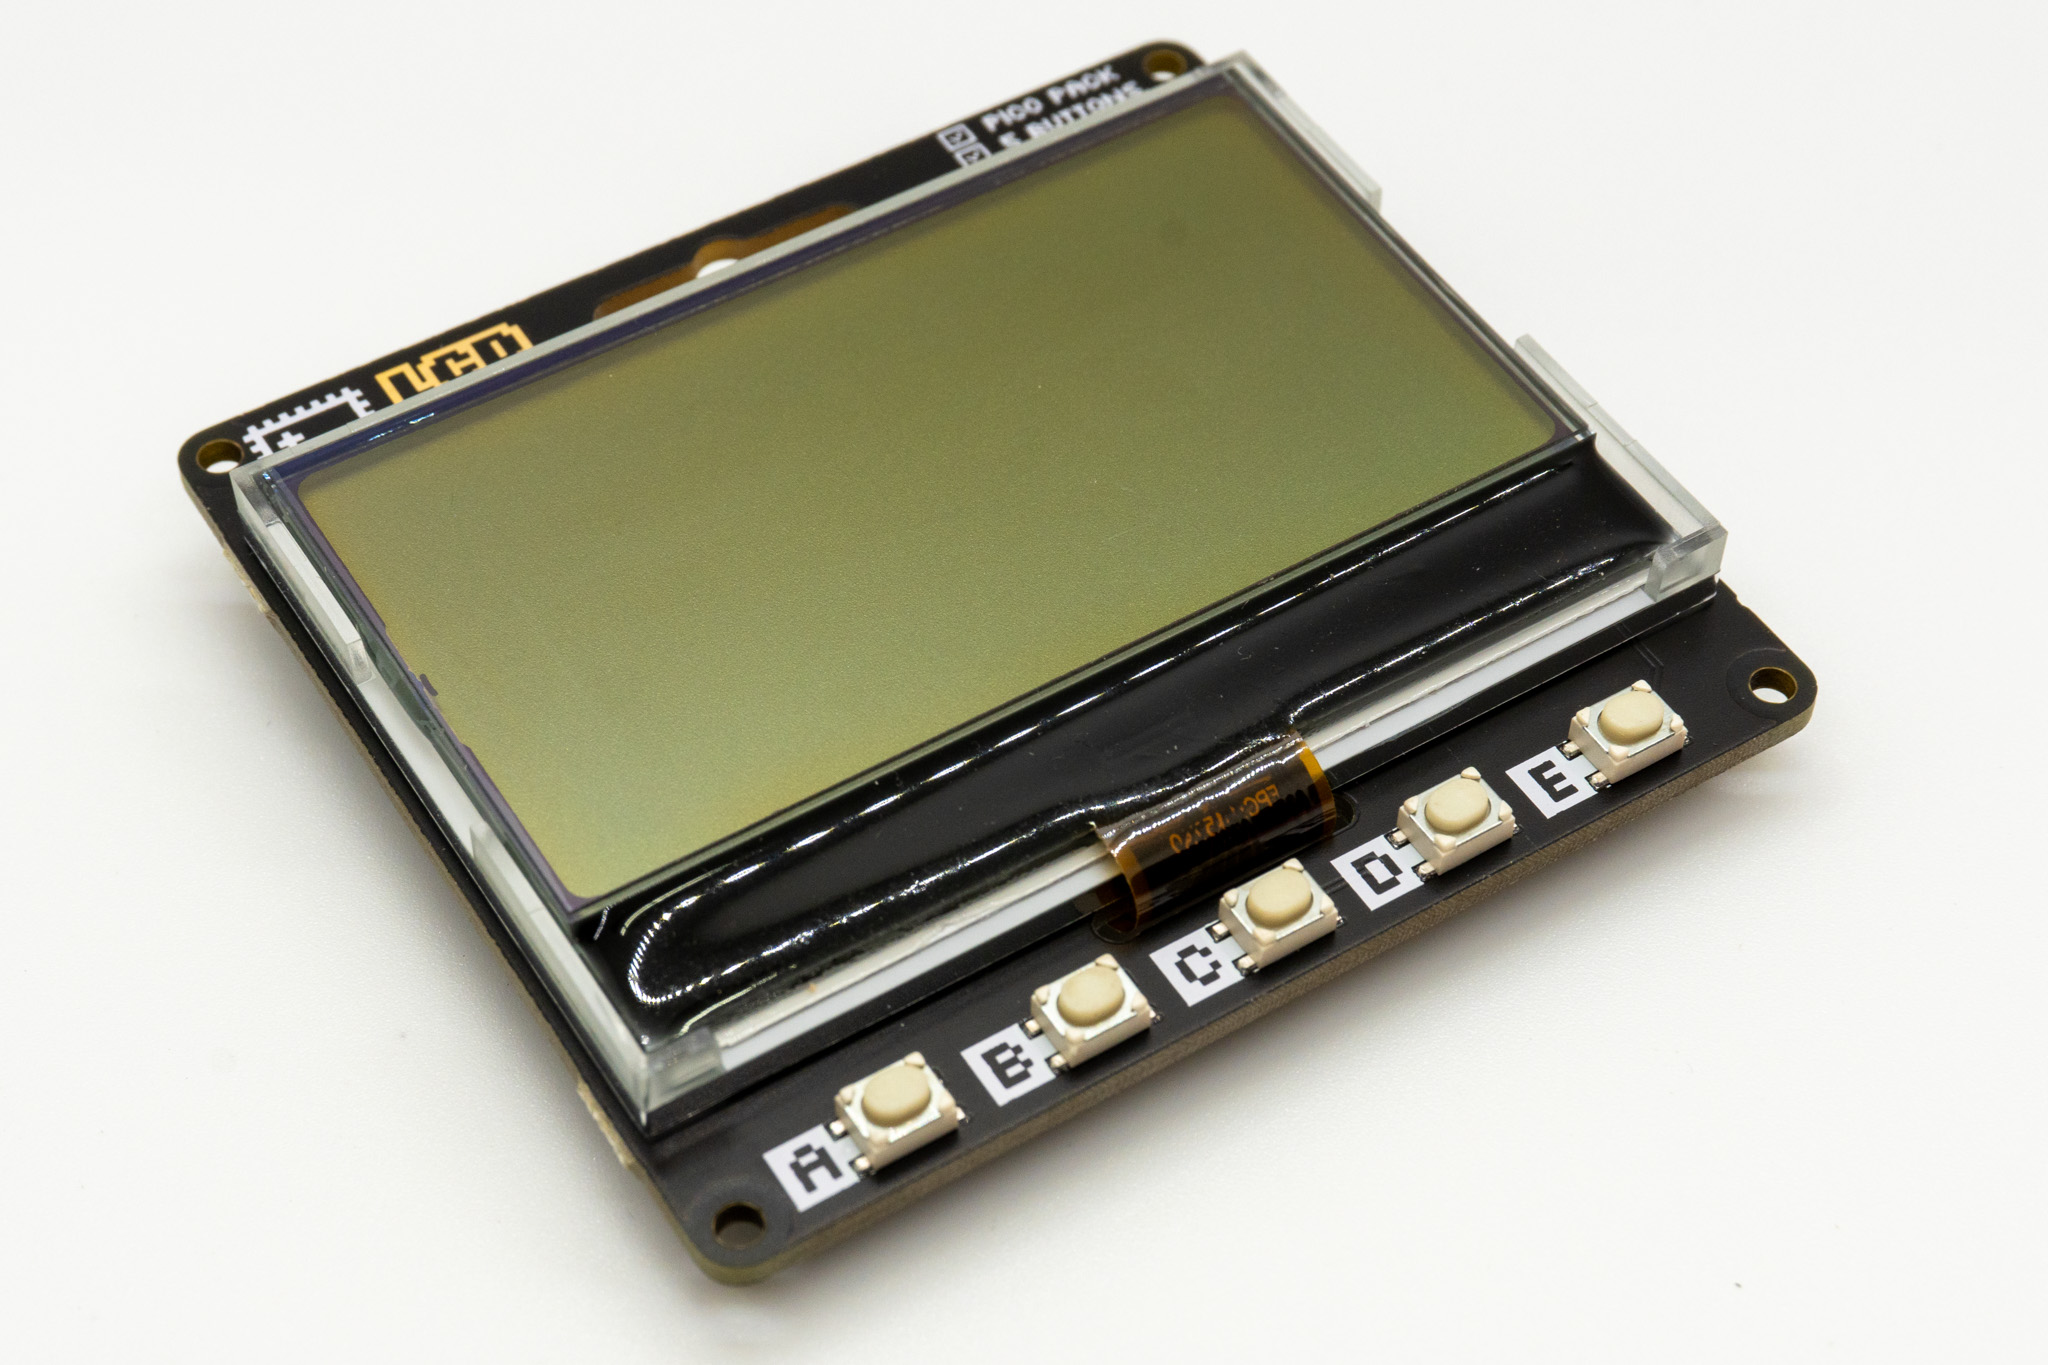
I selected the Pico GFX Pack development board. It had the right kind of display (with an RGB backlight!), a set of pushbuttons, and a slot for the Pico.
Glue PCB
The Pico GFX board didn’t have the exact functionality I needed, so I made a “glue PCB” to add some functions:
- LiPo battery connector
- Charging IC
- Power circuit
- GPS connection
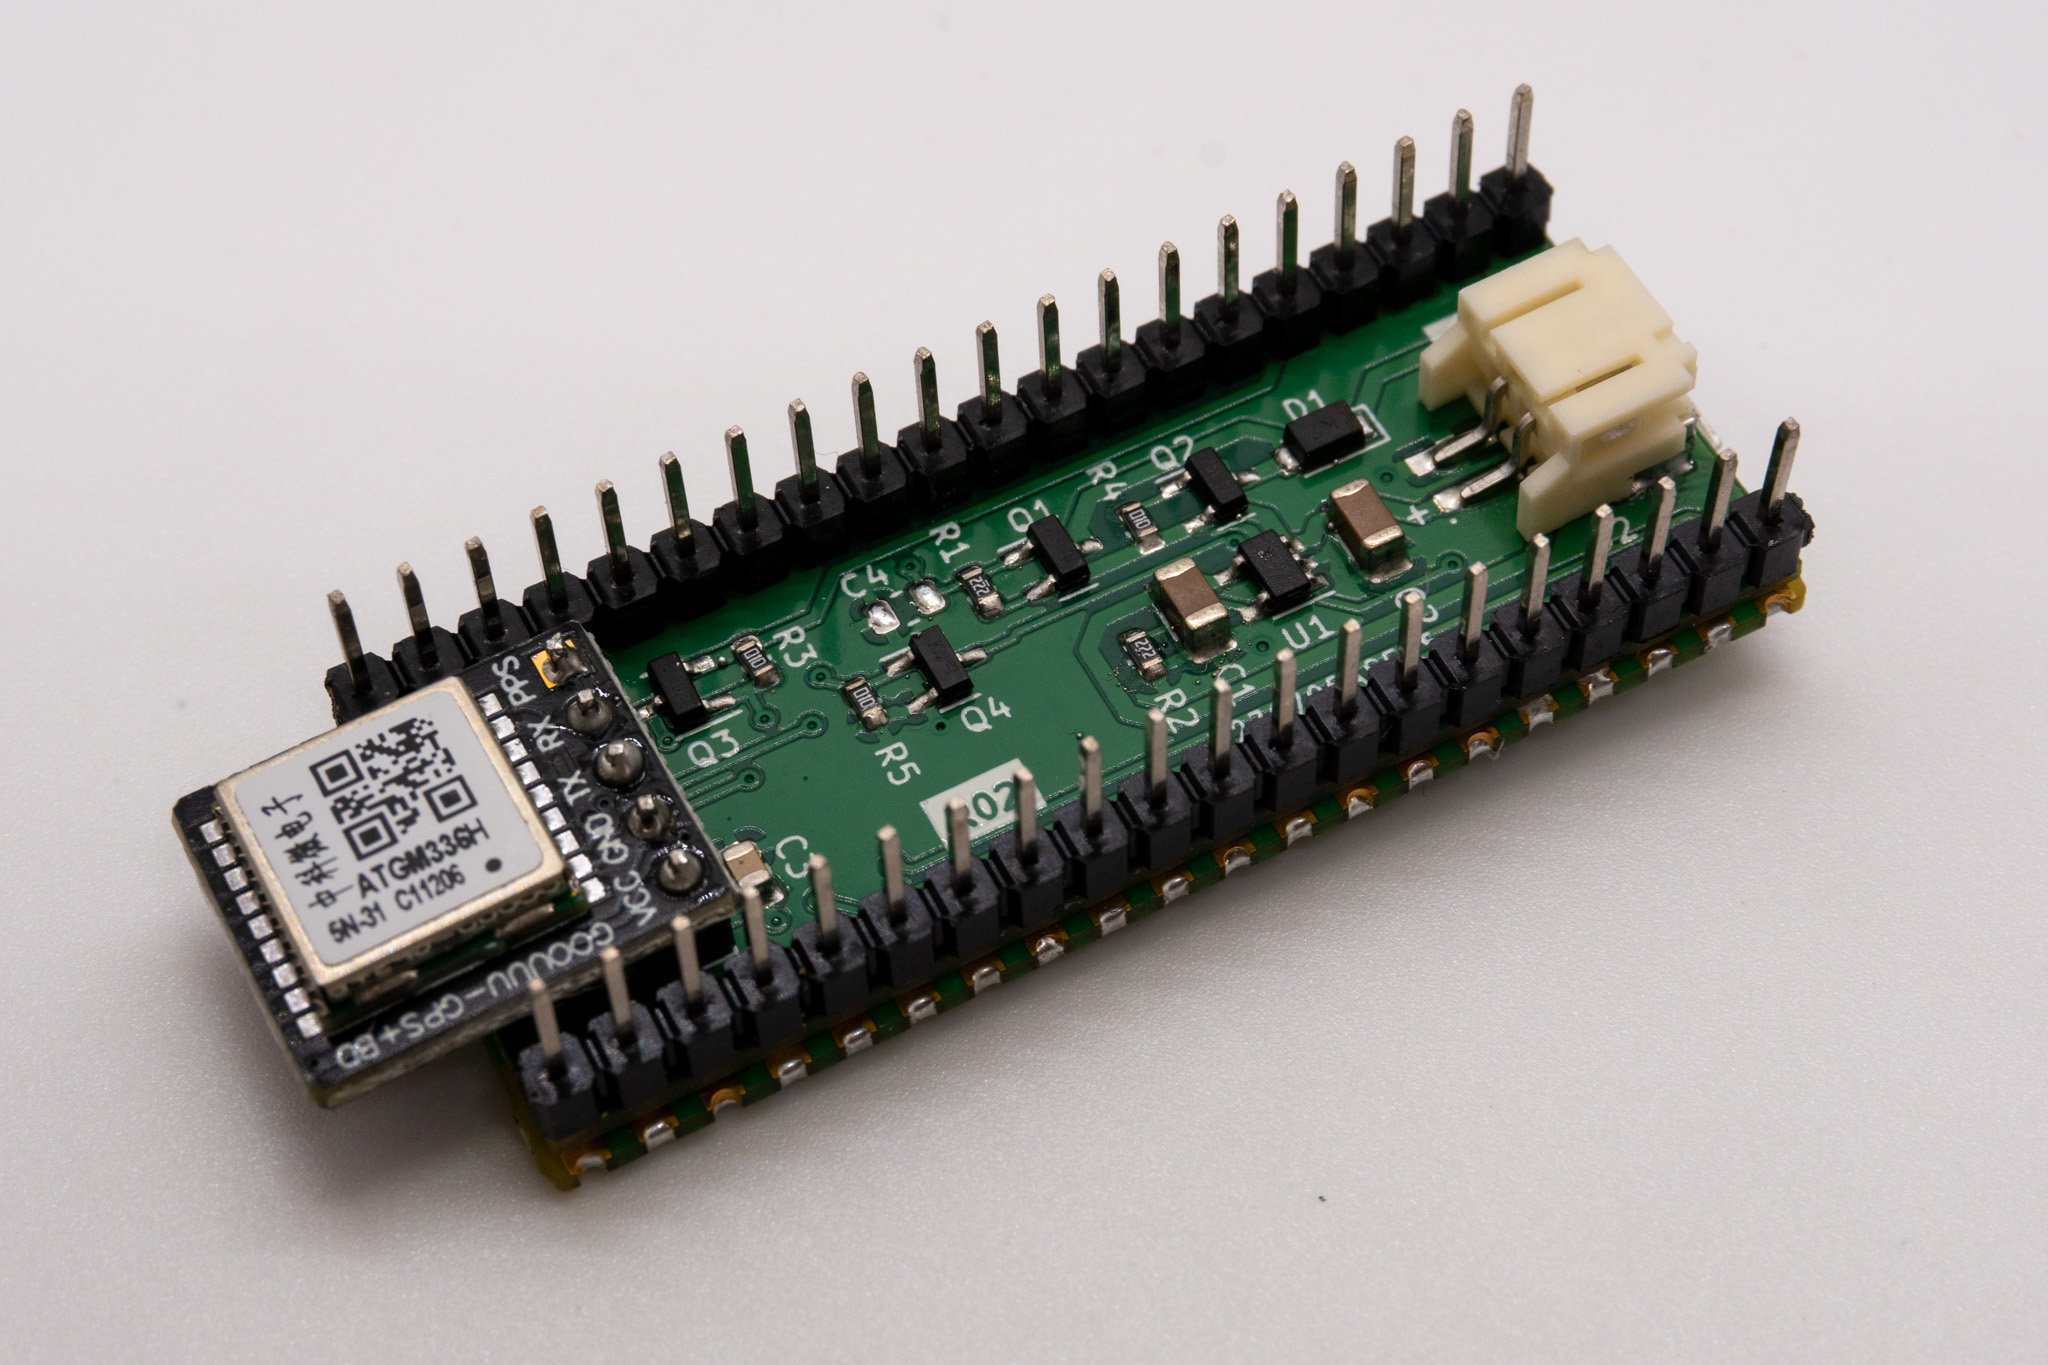
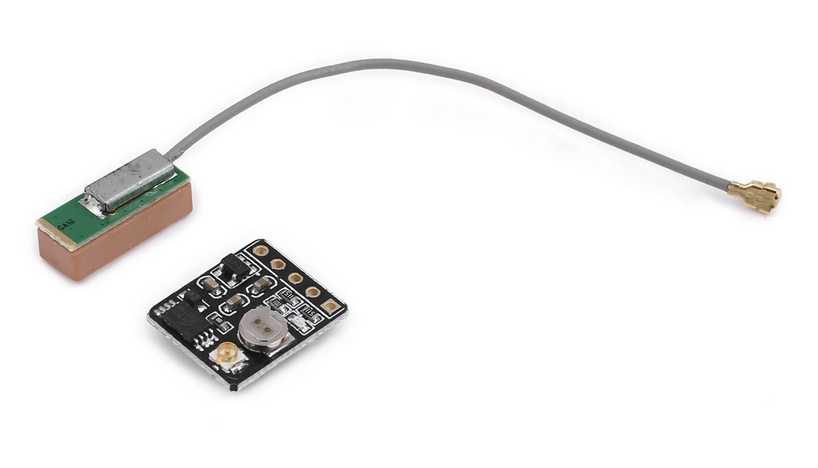
GNSS Receiver
Aliexpress has a great, low-cost option for a GNSS receiver with a UART interface. It includes an antenna. Total per unit cost (including shipping from China) was $3.77 per unit for quantity 25. 🤯
 Surprisingly, I was able to find a working, English version of the UI used to configure the receiver.
I ended up just using the receivers without any customization. It outputs plenty of info by default. I tried tweaking a few settings in an attempt to lower the power consumption (like number of constellations, update rate, filtering). Unfortunately, nothing I tried significantly lowered the power.
Microcontroller
I chose the Raspberry Pi Pico, mostly because it allowed me to use the display breakout. However, RP2040s have an excellent price to performance ratio. Bought in quantities of 10s, they are only about $4. The Pico has dual ARM Cortext M0 cores, 264kB of SRAM, 2MB of on-board flash memory, and native USB.
Power button circuit
The power circuitry is a bit tricky. I wanted to be able to turn the power on and off with one of the buttons included on the GFX pack board rather than adding additional hardware.
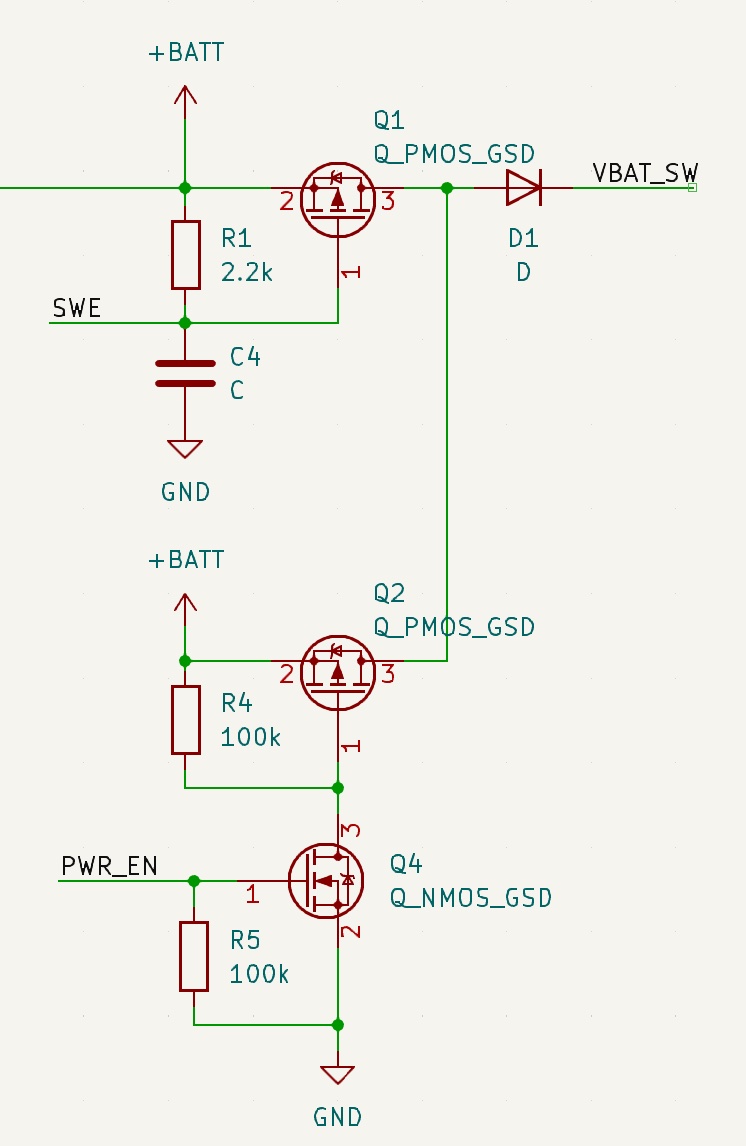
The pushbutton to ground on SWE activates Q1, providing power while pressed. After the microcontroller comes online, it will assert PWR_EN, turning on Q4 and Q2 as a parallel power path. The microcontroller can now deassert PWR_EN to turn off, which allows automatic shutdown to the lowest power state.
SWE is pulled down to ground on microcontroller startup (default pin state) with a value between 50 to 80 kΩ. Hence the strong pullup R1. When the microcontroller is powered down, leakage current spec is 1uA.
Battery
Battery life was important to this project, because remembering to charge a device out on the playa is definitely not top priority. I did not do anything particularly sophisticated to select the battery - I found a Lipo from Adafruit that roughly matched the dimensions of the LCD board and maximized capacity.
| Usage Time | Backlight Setting | Power [W] | Estimated Life [days] |
|---|---|---|---|
| 1 hour / day | Off | 0.116 | 64.1 |
| 1 hour / day | Max | 0.230 | 32.0 |
| 4 hour / day | Off | 0.116 | 16.0 |
| 4 hour / day | Max | 0.230 | 8.0 |
The largest contributor to power consumption was the backlight, followed by the GPS and RP2040. Reducing the clock frequency to 48MHz reduced power by about 50 mW and still allows USB function.
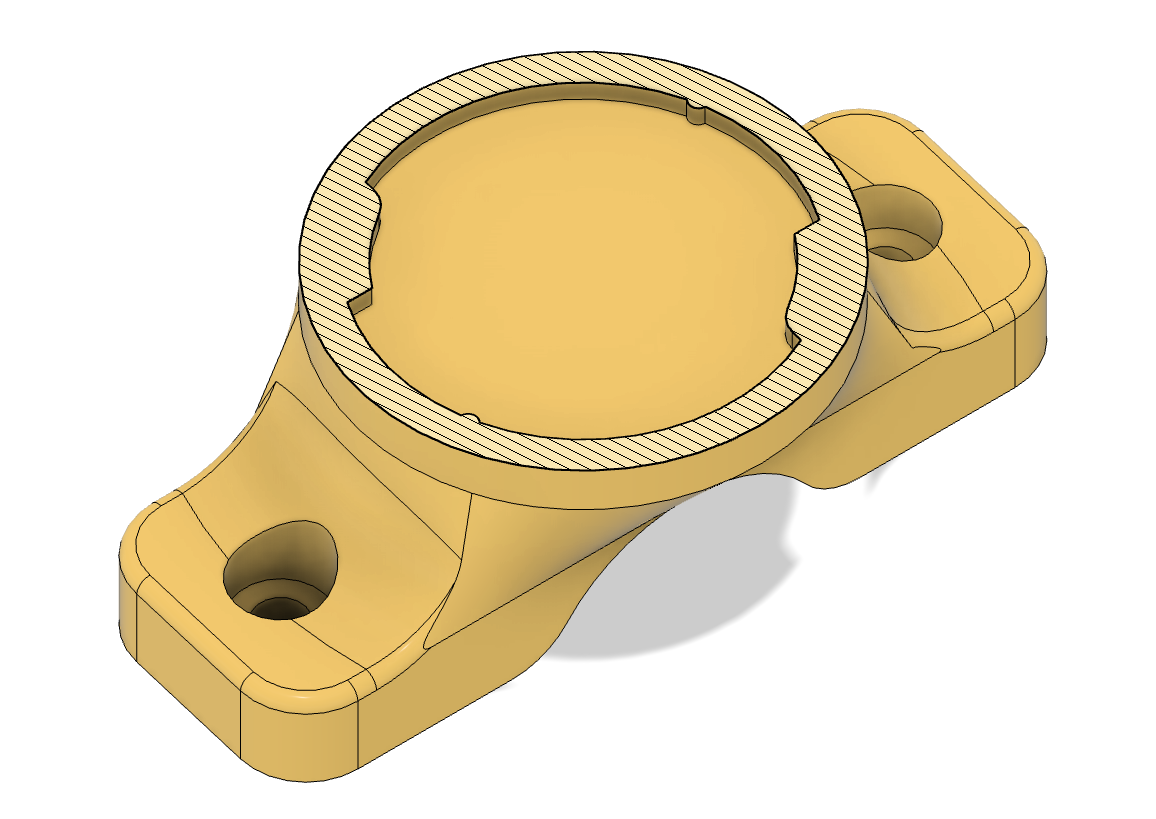
Internal Construction
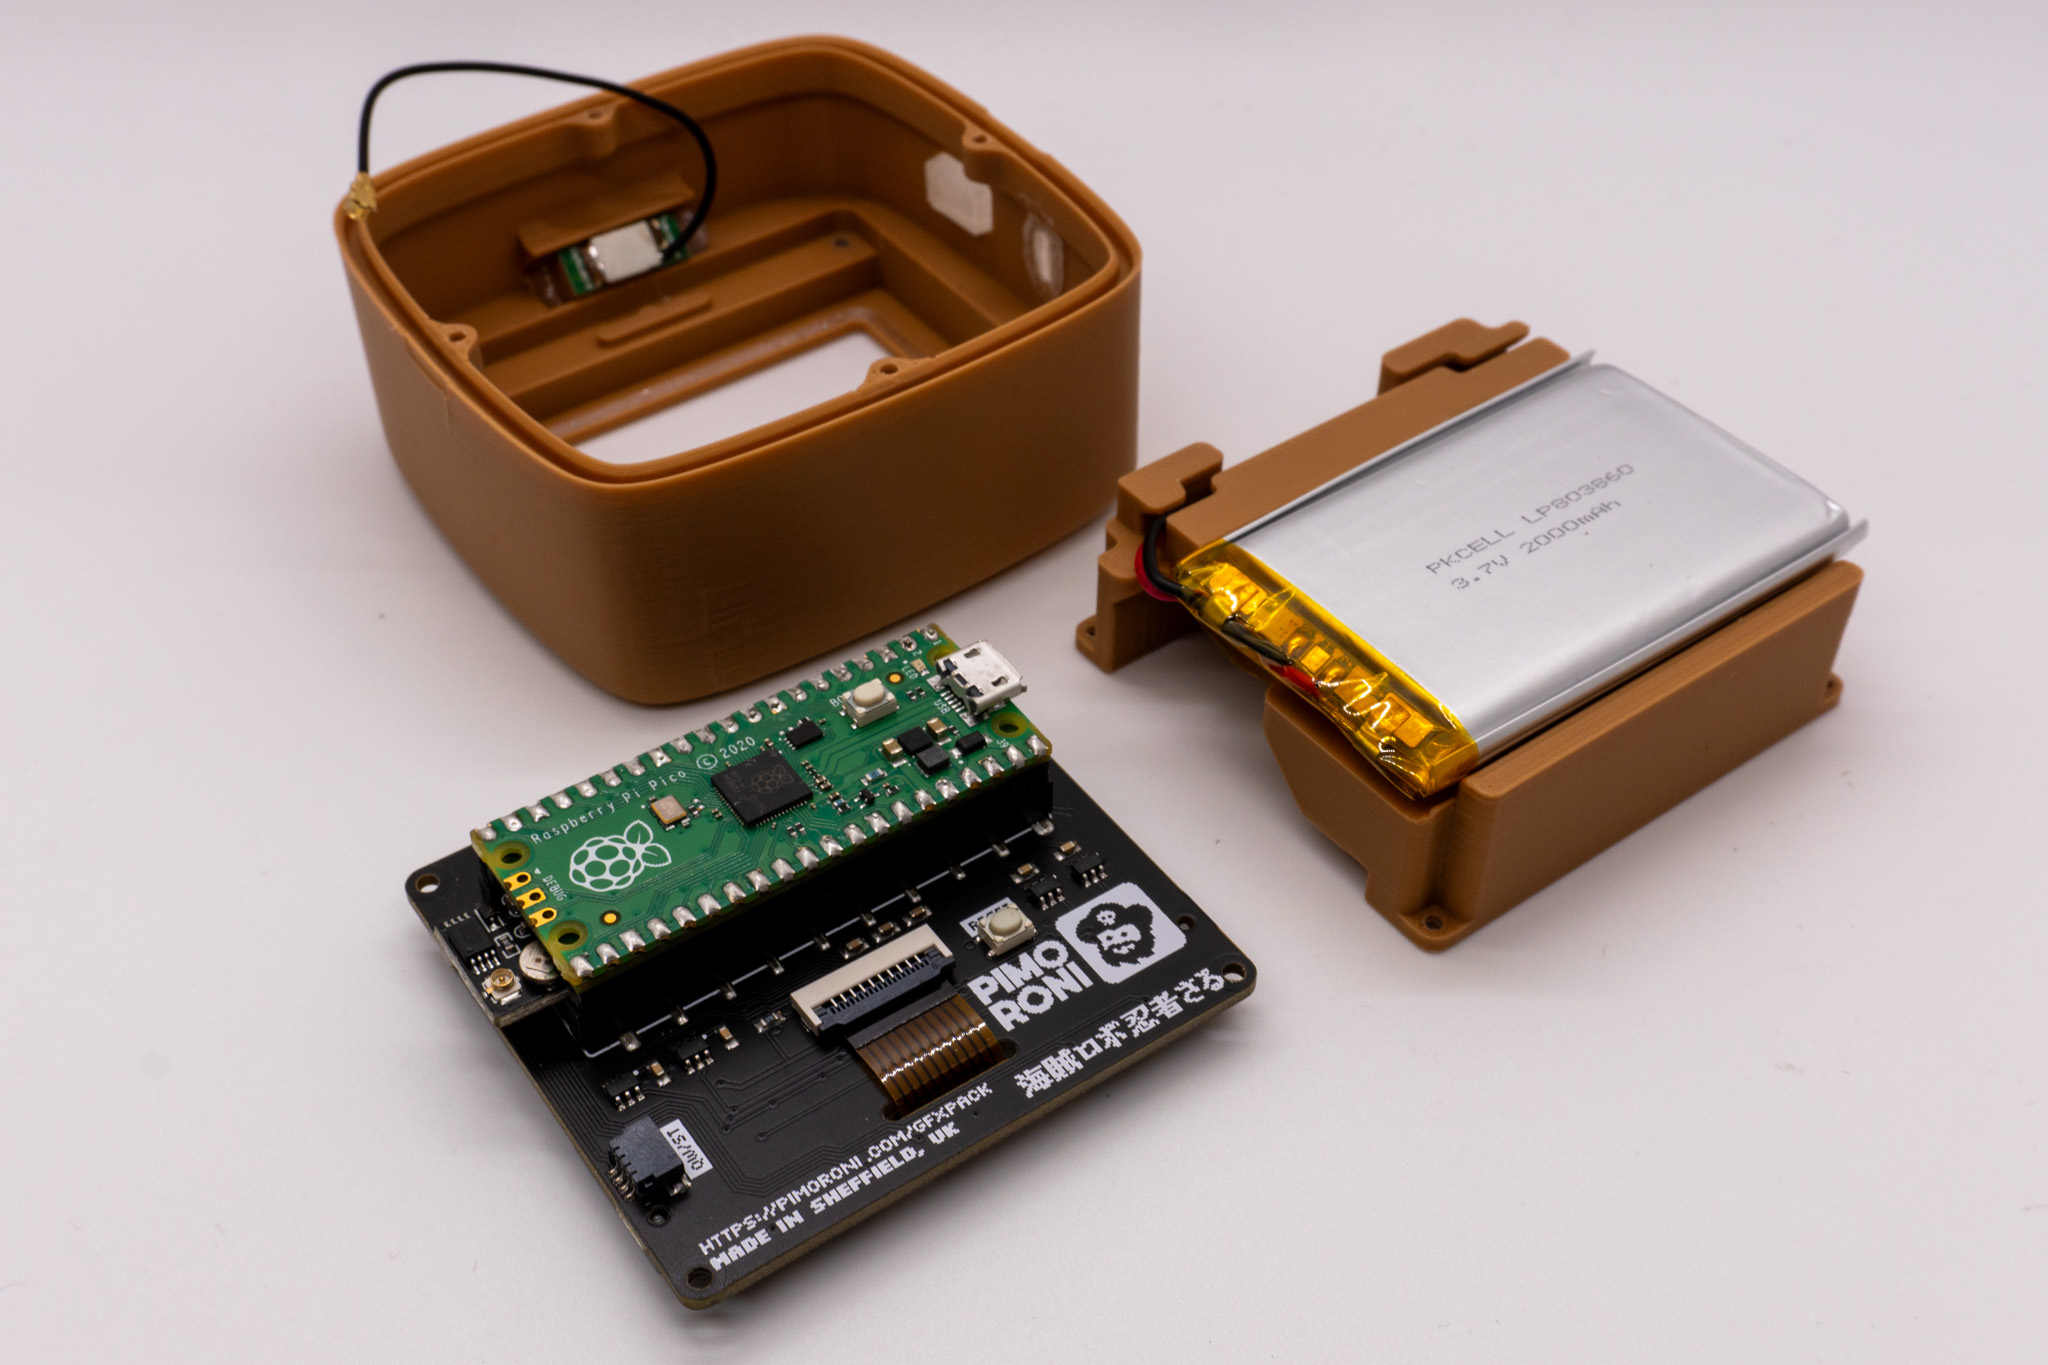
The internal assembly stacked multiple pieces:
- GPS antenna pointed at a 45° angle.
- Pico GFX with the LCD glass pressed against the gasket and front face.
- Pico board + glue board.
- Battery mounted onto a riser.
The riser keeps the battery safely away from sharp pins underneath. I was worried that the battery could be pierced if there was no protection above and below. It has some channels to guide the battery’s wires around to the right side, where it plugs into the glue PCB.
The back cover has a groove and slot design, which gives some minimal sealing against dust and water ingress.
Bike Mount
I wanted the navigator to be mounted to the bike most of the time, but also make it easy to pull it off the bike to navigate while walking. I found an open-source design from Wahoo Fitness for twist-lock bike mounts.
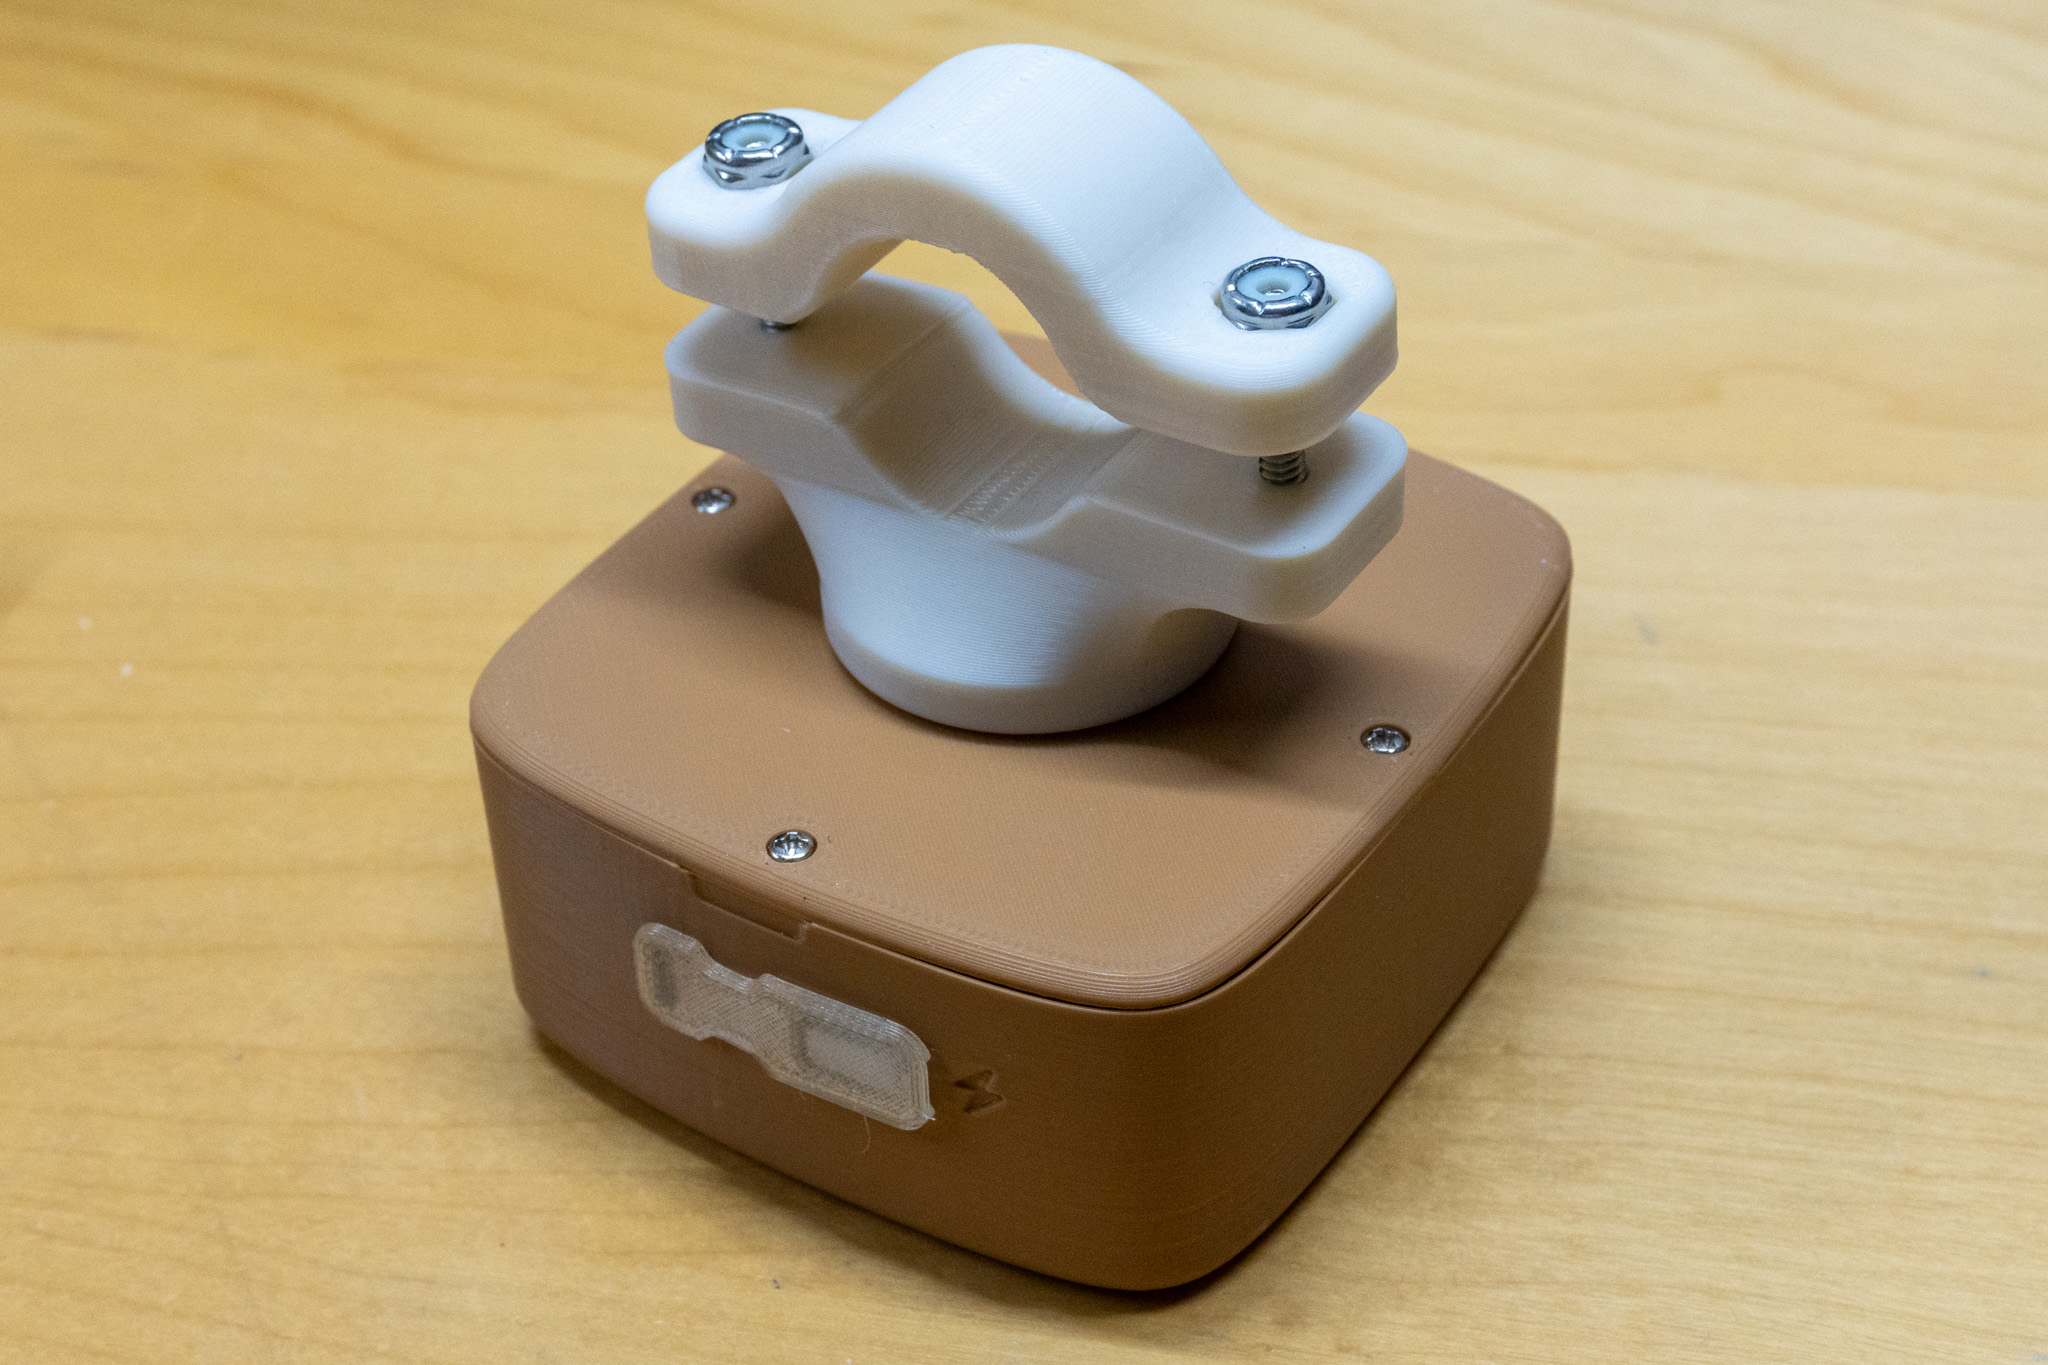
I found that the small tabs were brittle when 3D-printed. Also, the open source files were not parametric. I re-implemented the twist lock design with similar dimensions.
Flexible Parts
The assembly ended up needing three flexible parts: a cover flap for the charging port, buttons, and a gasket between the display and the body. I used clear TPU. The clear buttons redirect some of the LCD’s backlight, illuminating them.
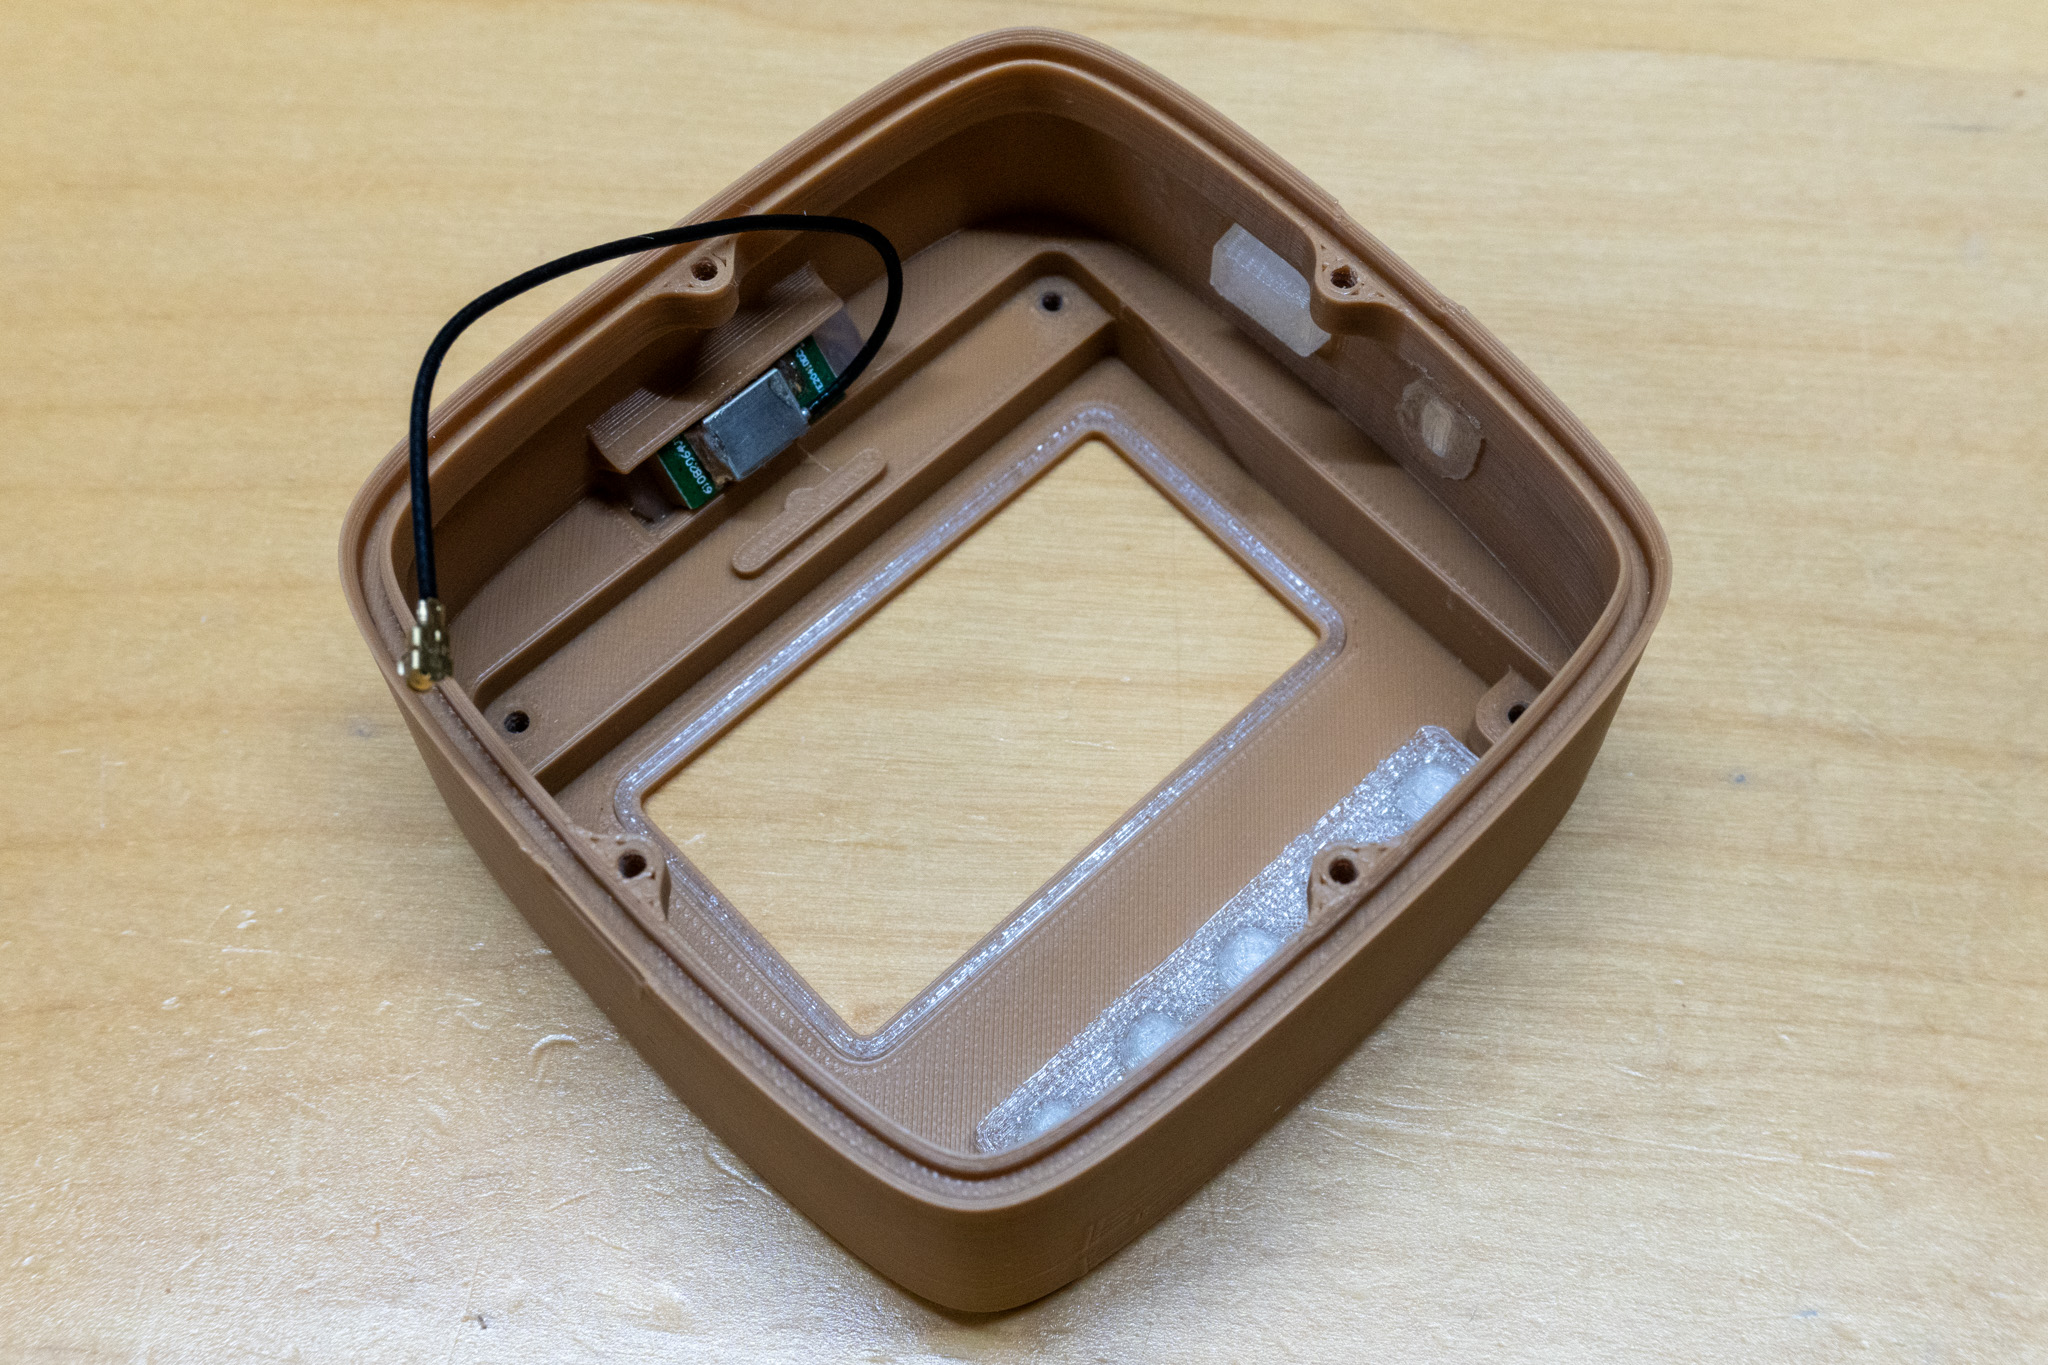
Rather than using a screw or other fastener to keep the charging port cover flap connected to the body, I added a column of material that I melted with a soldering iron. The bond is suprisingly strong - you would have to try hard to rip it off.
The LCD has a flat glass face. The TPU gasket pressed between the outer case and the glass keeps dust and water out.
Cost Breakdown
| Qty | Item | Unit Cost [$] | Total Cost [$] |
|---|---|---|---|
| 1 | Pico GFX Pack | 17.05 | 17.05 |
| 1 | Raspberry Pi Pico | 4.03 | 4.03 |
| 1 | Lithium Ion Battery - 3.7V 2000mAh | 11.25 | 11.25 |
| 1 | GPS+BDS dual-mode module | 3.77 | 3.77 |
| 1 | PCB | 3.00 | 3.00 |
| 1 | PCB components | 3.10 | 3.10 |
| 1 | 3D printed parts (filament cost) | 3.00 | 3.00 |
| Total | 45.20 |
Firmware
LVGL for Graphics
LVGL is an impressive C graphics library designed for embedded applications. I chose it because I wanted to try it, and it is possible to run the same code for the host machine. The ability to emulate on the host is a huge timesaver when making small tweaks.
Map Data
The Burning Man org website started publishing map data about the playa. It has become especially detailed starting in 2023. The published data includes KMZ and GeoJSON files defining a map of the roads, promenades, portos, city outline, etc.
For this project, the Navigator device must know:
- City center location
- Radial distance from center to each road
- Location of each porto

The true map has some additional nuance that I did not add - like the circular Rod’s Road at 6:00.
Bearing Algorithm
The bearing signal output by the GPS by default is very poor on this receiver. To get more stable readings, I wrote my own algorithm to track the user’s bearing.

The algorithm stores two points: a start and end location. The current bearing is the vector from start to end. Whenever the current location deviates more than a configurable distance from stored end location, then end = start and start = current.
The adjustable minimum baseline distance makes it less susceptible to location noise.
USB Configuration File
These devices took too long to manufacture to just toss them after one year. Since the map changes each year, I added the ability to reconfigure them with a JSON file via USB mass-storage device.
Under the hood, PlatformIO uses mbed-based platform for RP2040 support. This luckily includes USB support, including emulating a mass storage device. Combined with ArudinoJSON, this gives an easy method to update the relevant coordinates each year without flashing.
Here is the 2023 configuration file:
{
    "map": {
        "name": "BM2023-USB",
        "center": [40.786400, -119.203500],
        "rotation_deg": -45.0,
        "roads": [
            {"name": "S", "radius_ft": 2500},
            {"name": "A", "radius_ft": 2940},
            {"name": "B", "radius_ft": 3230},
            {"name": "C", "radius_ft": 3520},
            {"name": "D", "radius_ft": 3810},
            {"name": "E", "radius_ft": 4100},
            {"name": "F", "radius_ft": 4590},
            {"name": "G", "radius_ft": 4880},
            {"name": "H", "radius_ft": 5170},
            {"name": "I", "radius_ft": 5460},
            {"name": "J", "radius_ft": 5650},
            {"name": "K", "radius_ft": 5845}
        ]
    },
    "bathrooms": [
        [40.78148727096226, -119.19194430573732],
        [40.779623335561965, -119.18768876029635],
        ...
    ]
}
Testing
Doing major firmware upgrades or debugging at Burning Man was not an option. I invested time in unit testing and interactive testing. The unit tests cover the most critical parts of the code (coordinate conversions, playa address formatting).
Hardware Checkout Test
I built about 20 of these devices, so a quick hardware go/no-go test was a time saver to detect issues early.
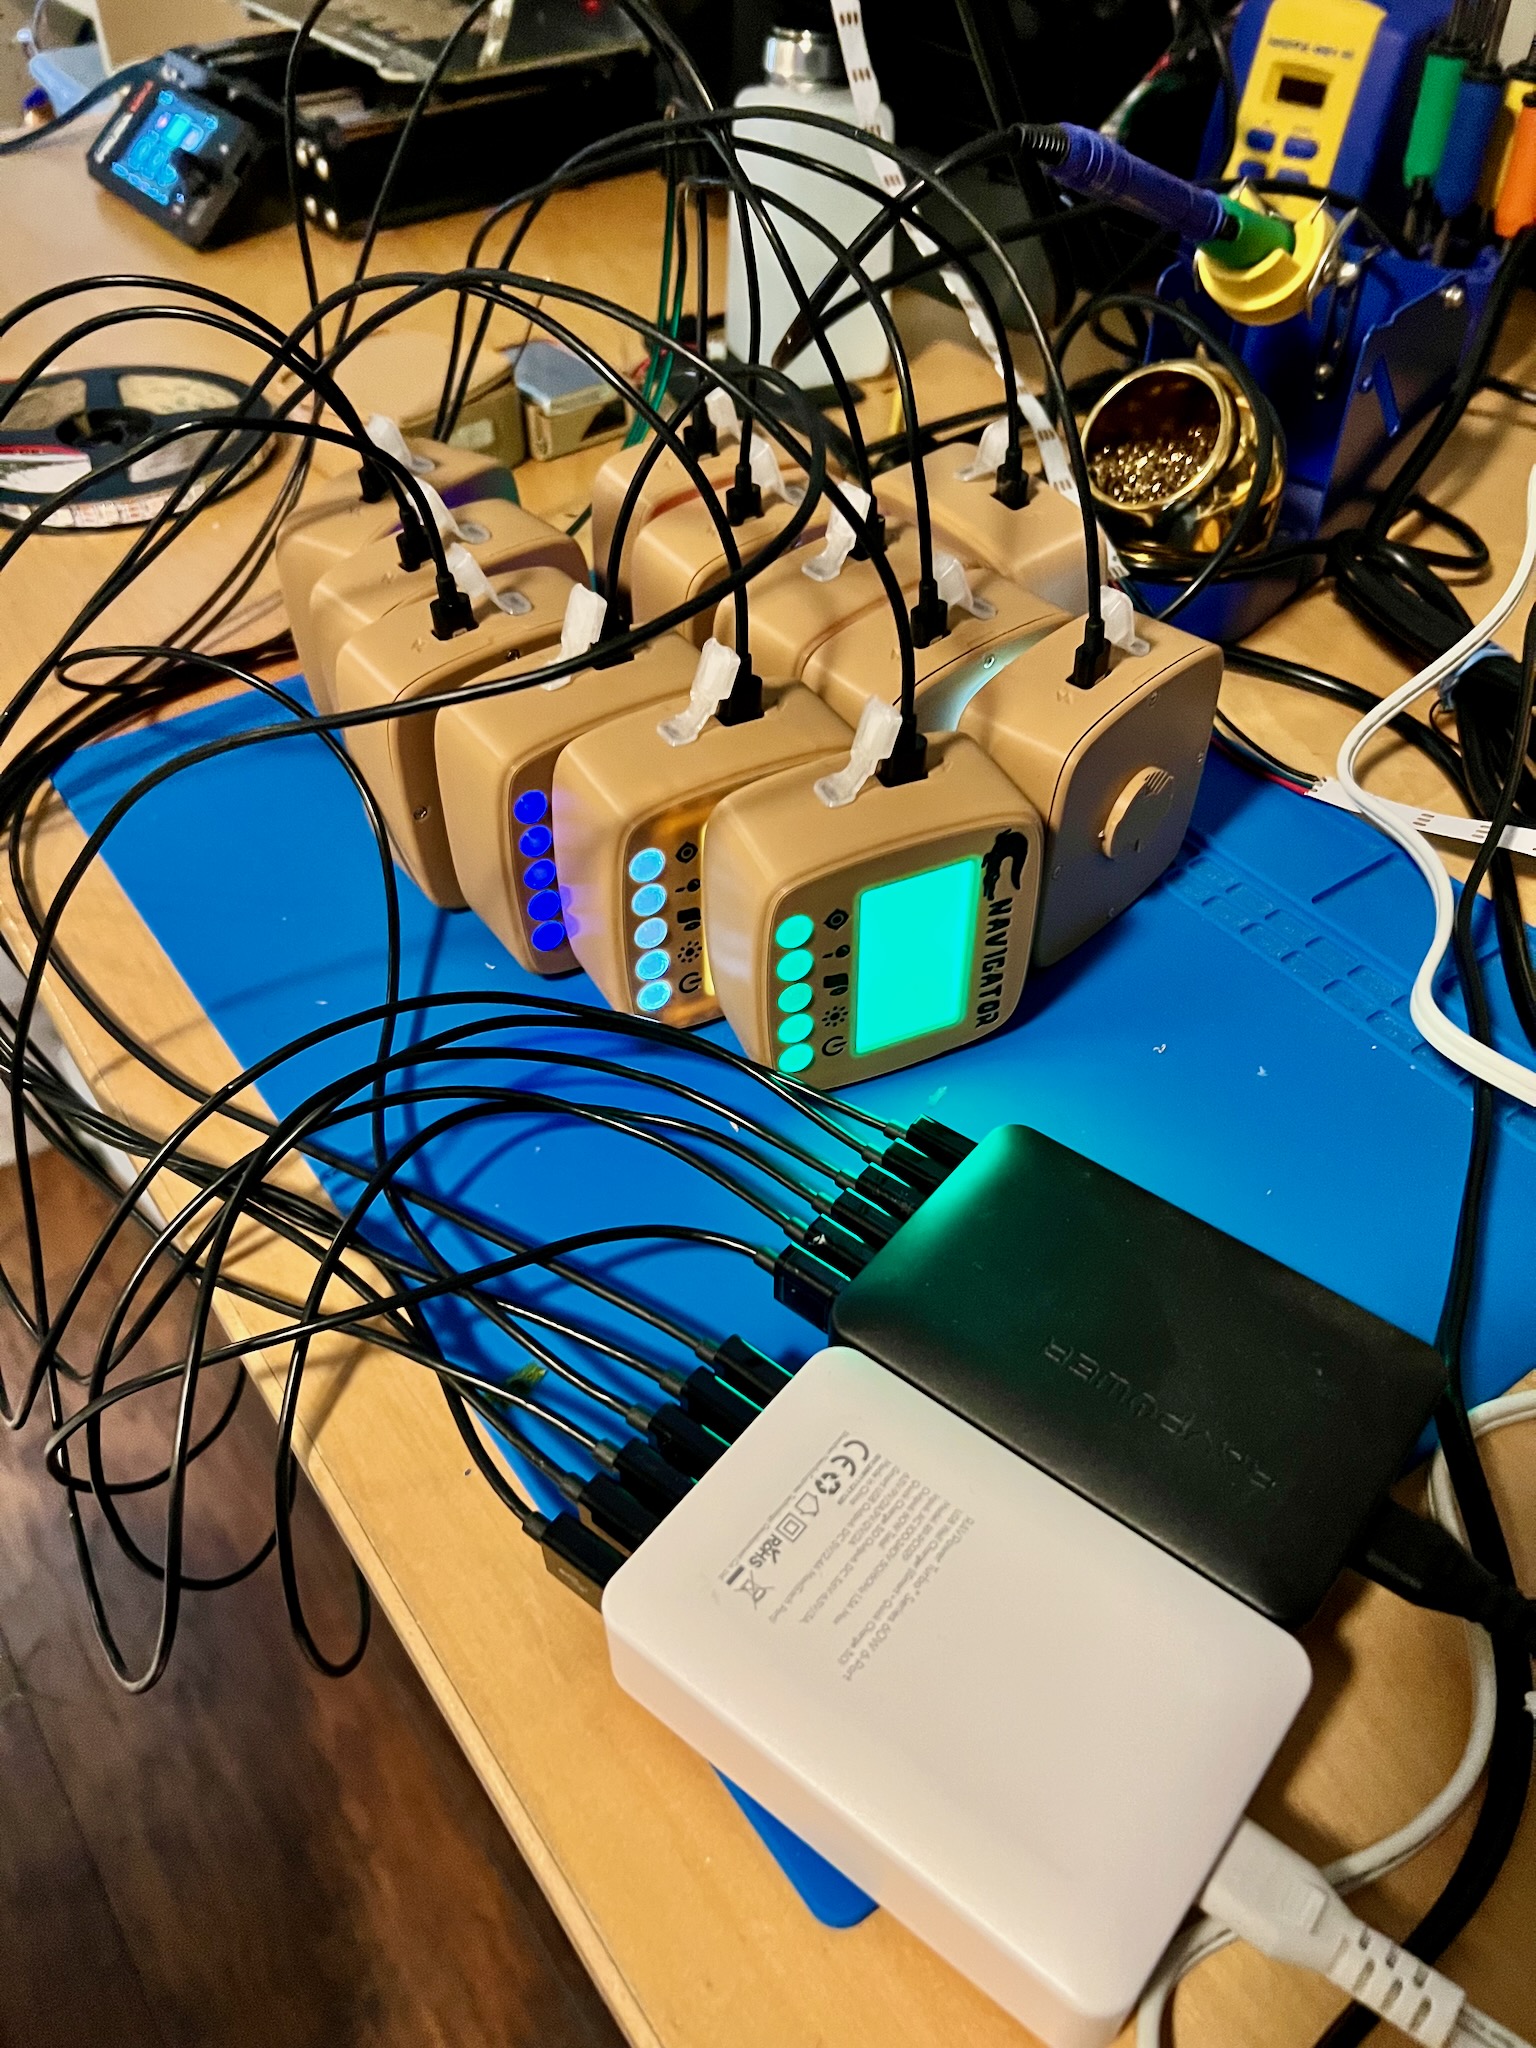
With minimal user input, the a special firmware can check these hardware elements:
- Backlight: cycle through R, G, B, W every 1 sec.
- Display: Show a repeating pixel pattern that moves.
- Buttons: Print button press state.
- Battery: Print charging state.
- GPS: Print total of incoming bytes from GPS UART.
IMO, it is important to keep the firmware for this check as simple as possible and independent of the main firmware; if the main firmware encounters a mysterious bug, I have a check to fall back on.
Running on Host
Running firmware on the host speeds up development. LVGL works on host machines through the cross-platform libSDL.
Interactive Testing in the Browser
Interactive tests can be a reasonable replacement for integration or unit tests that would otherwise be very sophisticated. I wanted to emulate being at any location on the playa, and checking that the display was showing the right address. It was perfect to test out if the bearing algorithm was giving the right directions to waypoints.

Making this test required:
- A map of the playa (from the BM provided data) in GeoJSON.
- A web app that can show a map of the playa, and send emulated GPS coordinates at a cursor to a websocket.
- Firmware running on the host that accepts GPS coordinates over a websocket.
I repurposed this code combining OpenLayers and Vite to make the webapp. I added a bit of code to import the map data, add a cursor, and send the coordinates.
To connect the firmware to the websocket, you could use a C/C++ websocket library. But it was easier to use websocat and then pipe the output into stdin.
websocat -s 9998 | ./.pio/build/host/program
The host version of the GPS driver then parses the coordinates in a separate thread:
static auto io_thread = std::thread([&] {
  std::string s;
  while (!error && std::getline(std::cin, s, '\n')) {
    double lat, lon;
    int n = sscanf(s.c_str(), "%lf,%lf", &lat, &lon);
    if (n == 2) {
      auto lock = std::unique_lock<std::mutex>(m);
      gps_info_.location.lat = lat;
      gps_info_.location.lon = lon;
      gps_info_.valid = true;
      lock.unlock();
    }
  }
  auto lock = std::unique_lock<std::mutex>(m);
  error = true;
  lock.unlock();
});
Results
This device worked incredibly well out on the playa. It was super convenient to leave on my bike and fire up to move on to the next destination. The backlight was essential for night operation.
I used the navigation feature to get back to camp often. I used it occasionally to get back to a dancing spot after using a distant bathroom.
The weather for the 2023 burn was wild, with several heavy rain storms. It continued to function after being out in the rain for hours. One Navigator was damaged when left inside a hot car. The PLA case melted enough to mess with the buttons. Its self-reported temperature just out of the car was 140°F!